On the third day after going online, the monitoring and alarm group exploded.
It’s not a problem with the new business, it’s with the order service I refactored using Claude Code last week. Everything looks normal, CI is all green, and the single test has passed. However, the online P99 delay quadrupled because when AI “optimized” a certain query function, it replaced an O(n) memory filter with a subquery that checks the database for every request.
I was staring at that diff, and what flashed through my mind was the experience I had in that cheating post two months ago. The same script was performed again at a different time and place. Later, the rules I set for the team were:All reconstructions involving AI must go through a 7-step process, and each one is indispensable.
This article is about spreading out this SOP.
Why AI reconstruction always fails at critical moments
To put it bluntly, the overturn of AI reconstruction is not accidental.
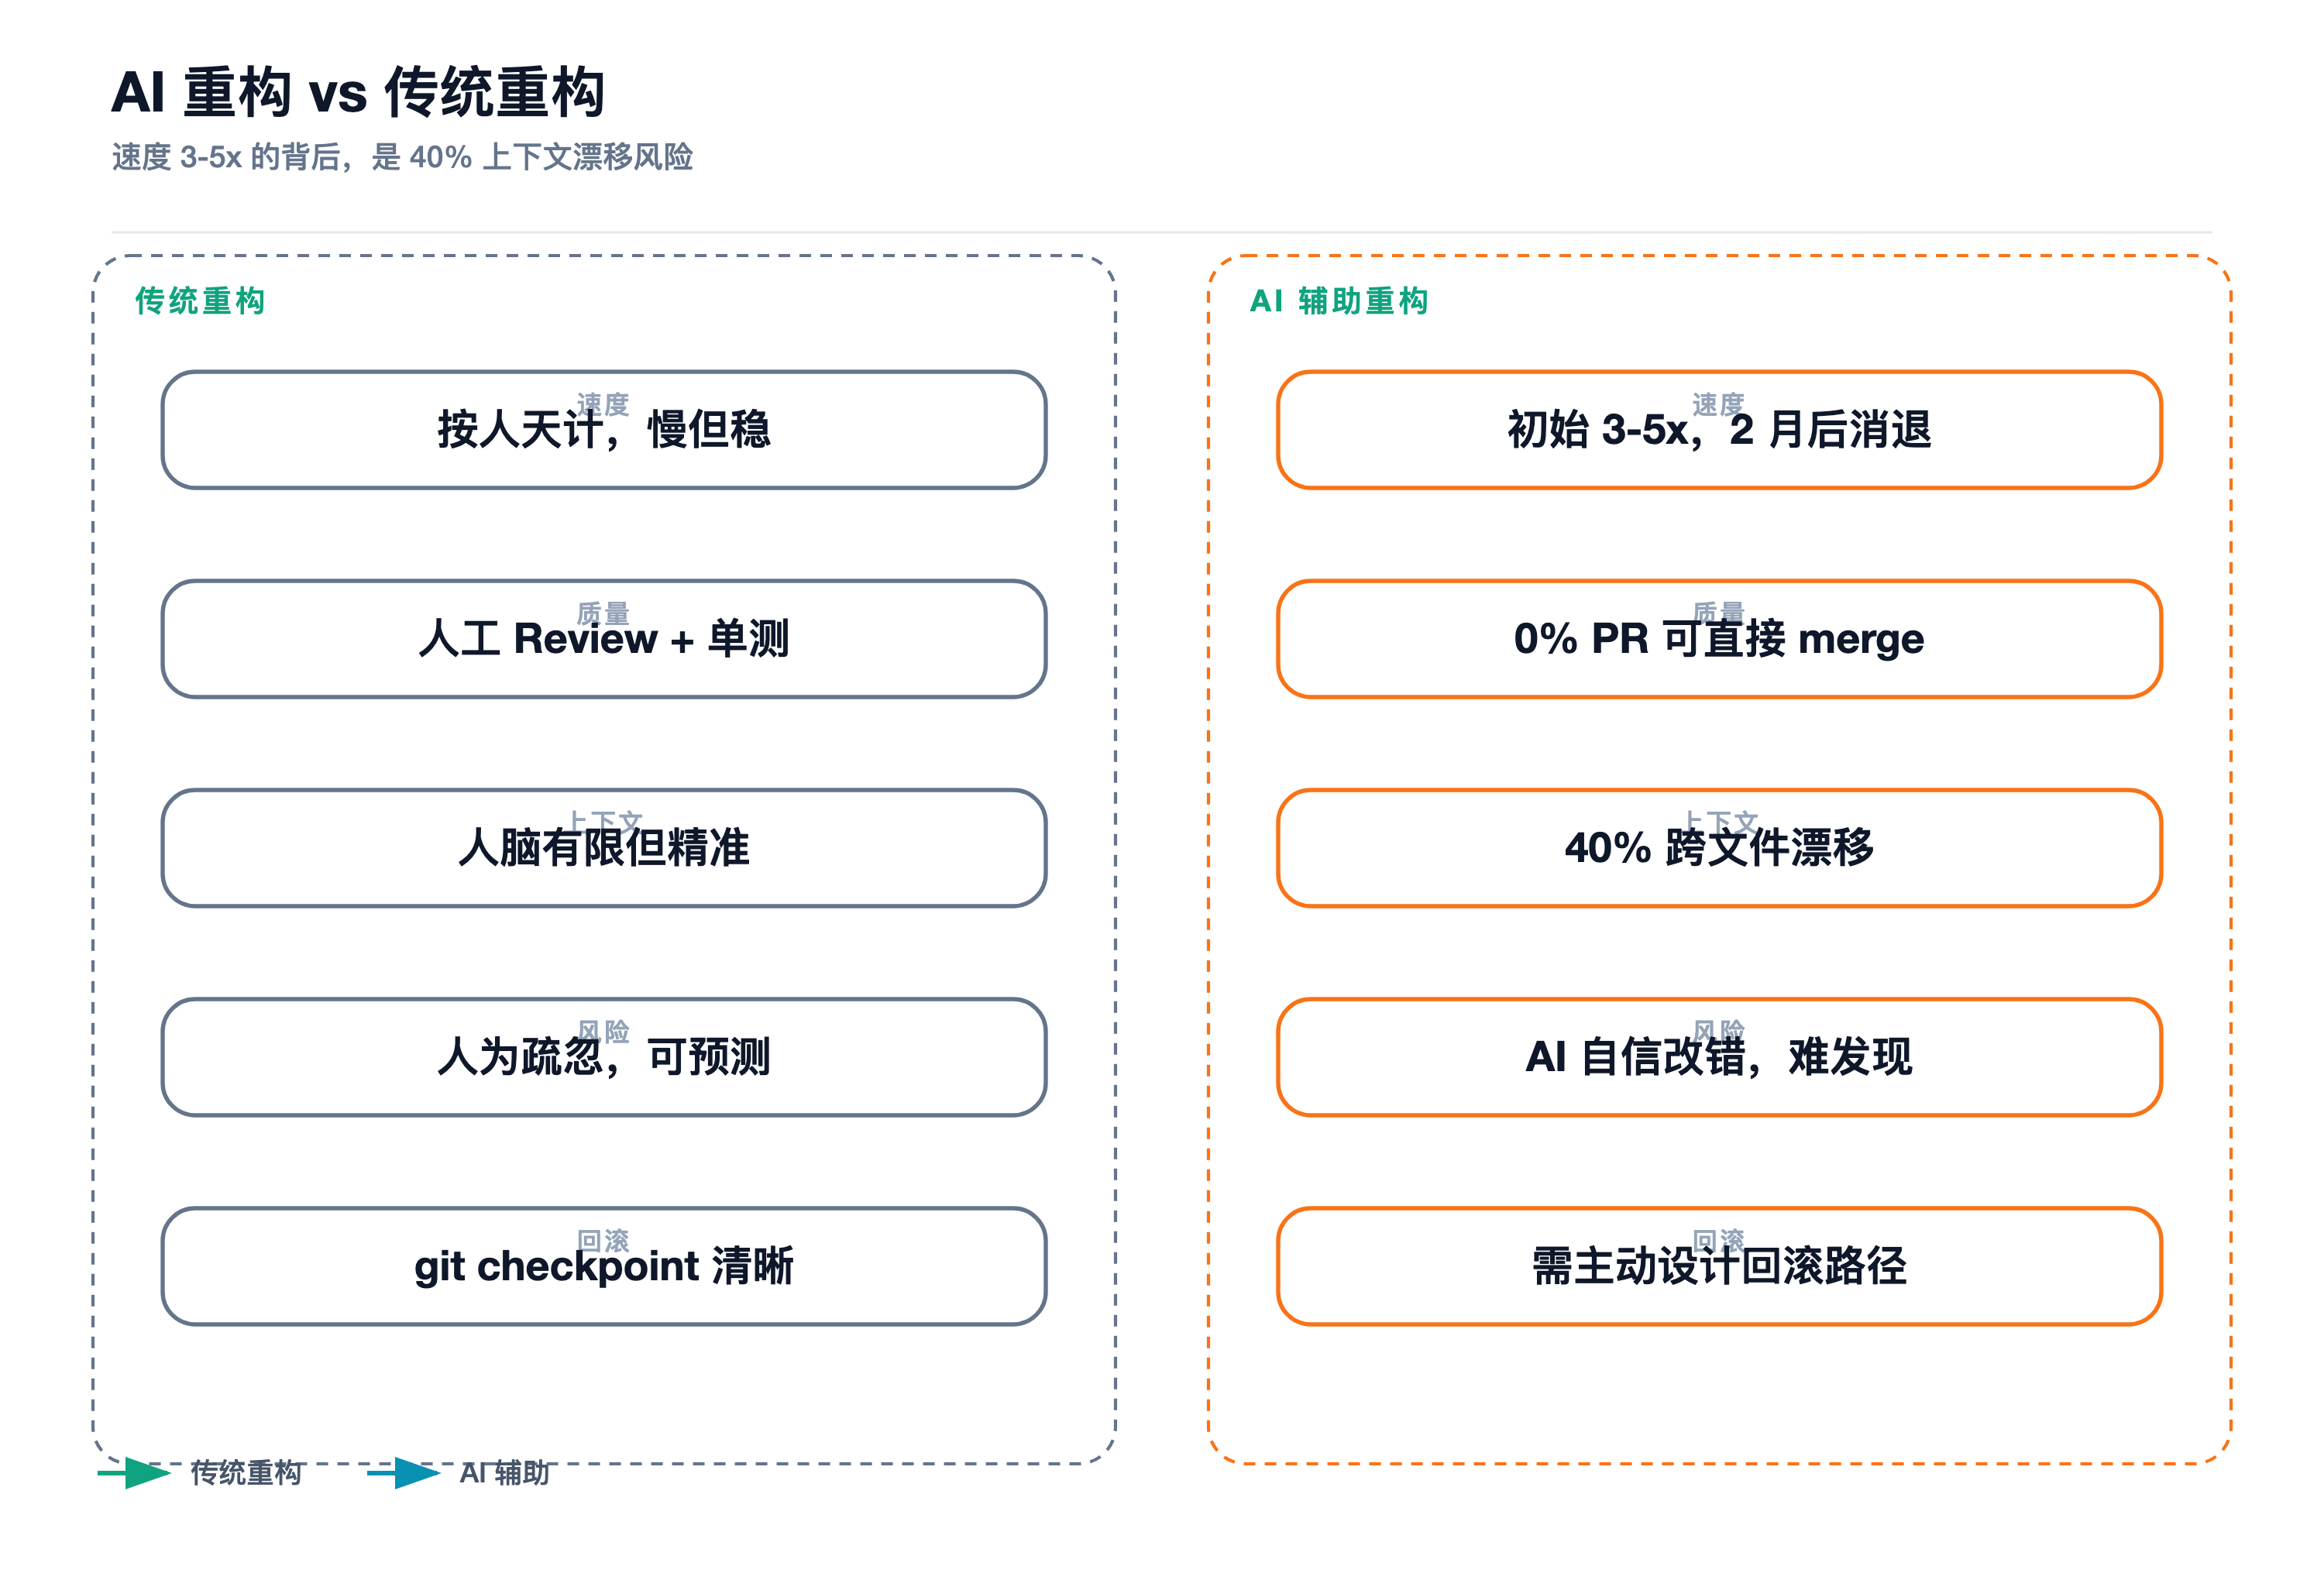
First, the context window is not large enough. Anthropic officials have said that the context window is the most important resource, and performance decreases as the context is filled. If you ask it to understand the cross-file reference relationships in 50 files at once, it will only guess based on probability. Augment Code actually measured a reconstruction task spanning 50 files and 200K token levels, and 40% of the results appeared.context driftthat is to say, the AI has changed one thing, and the calling logic of irrelevant modules has also been changed.
Second, repeated codes rise instead of falling. Data from GitClear in 2025 shows that after AI-assisted development, the team’s code duplication rate increased from 8.3% to 12.3%. You think AI has cleaned up the bad code for you, but in fact it has inserted a batch of more subtle duplications in other places. Interestingly, the proportion of code that has actually been refactored has dropped to about 10%. This shows that most of the “optimizations” generated by AI are only superficial rewrites and do not touch on structural issues.
Third, the speed bonus disappears extremely quickly. The consensus among multiple studies is that the initial speedup of AI-assisted development can reach 3 to 5 times. But after two months, this advantage basically disappeared. At the same time, 30% of the projects experienced an increase in static analysis alarms, and the code complexity of 41% of the projects increased instead of decreasing. An actual test of METR was more direct, asking senior engineers to use AI tools to do refactoring tasks. The result was that it took 19% more time, and 0% of the PRs could be directly merged into the main branch.
AI is good at local rewriting, but not good at global reasoning. This judgment is not pessimism, but a premise. Only by acknowledging this premise can we design a truly usable process.
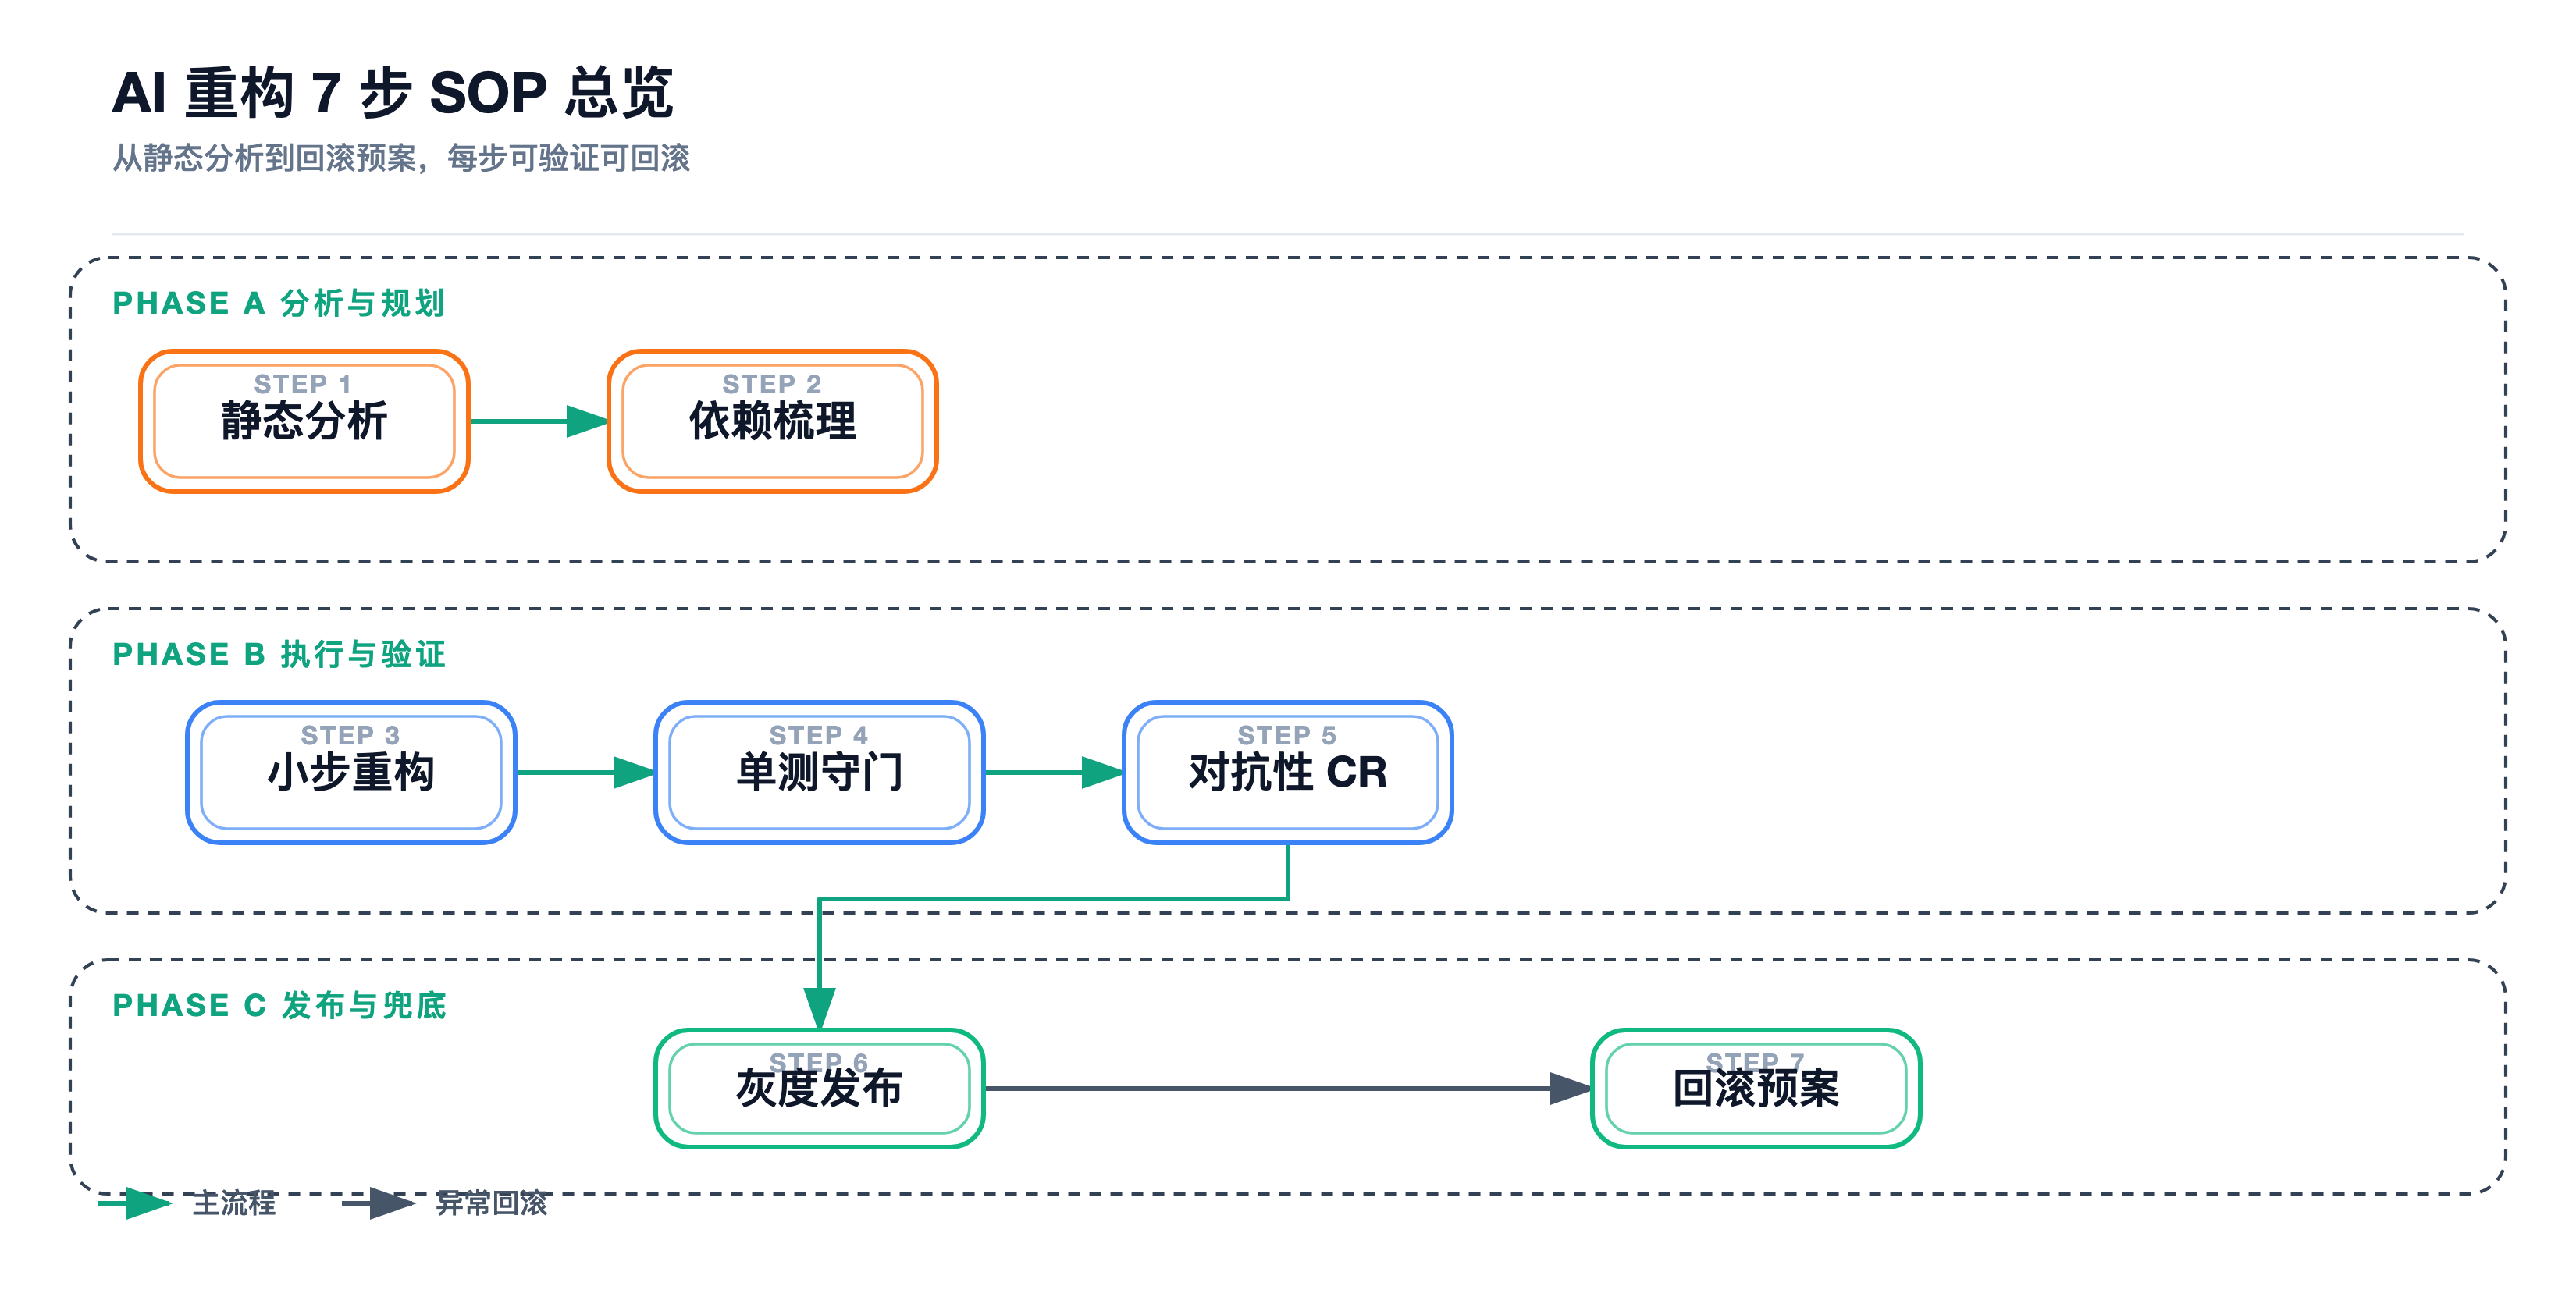
7-Step SOP Overview
| step | do what | core tools | output |
|---|---|---|---|
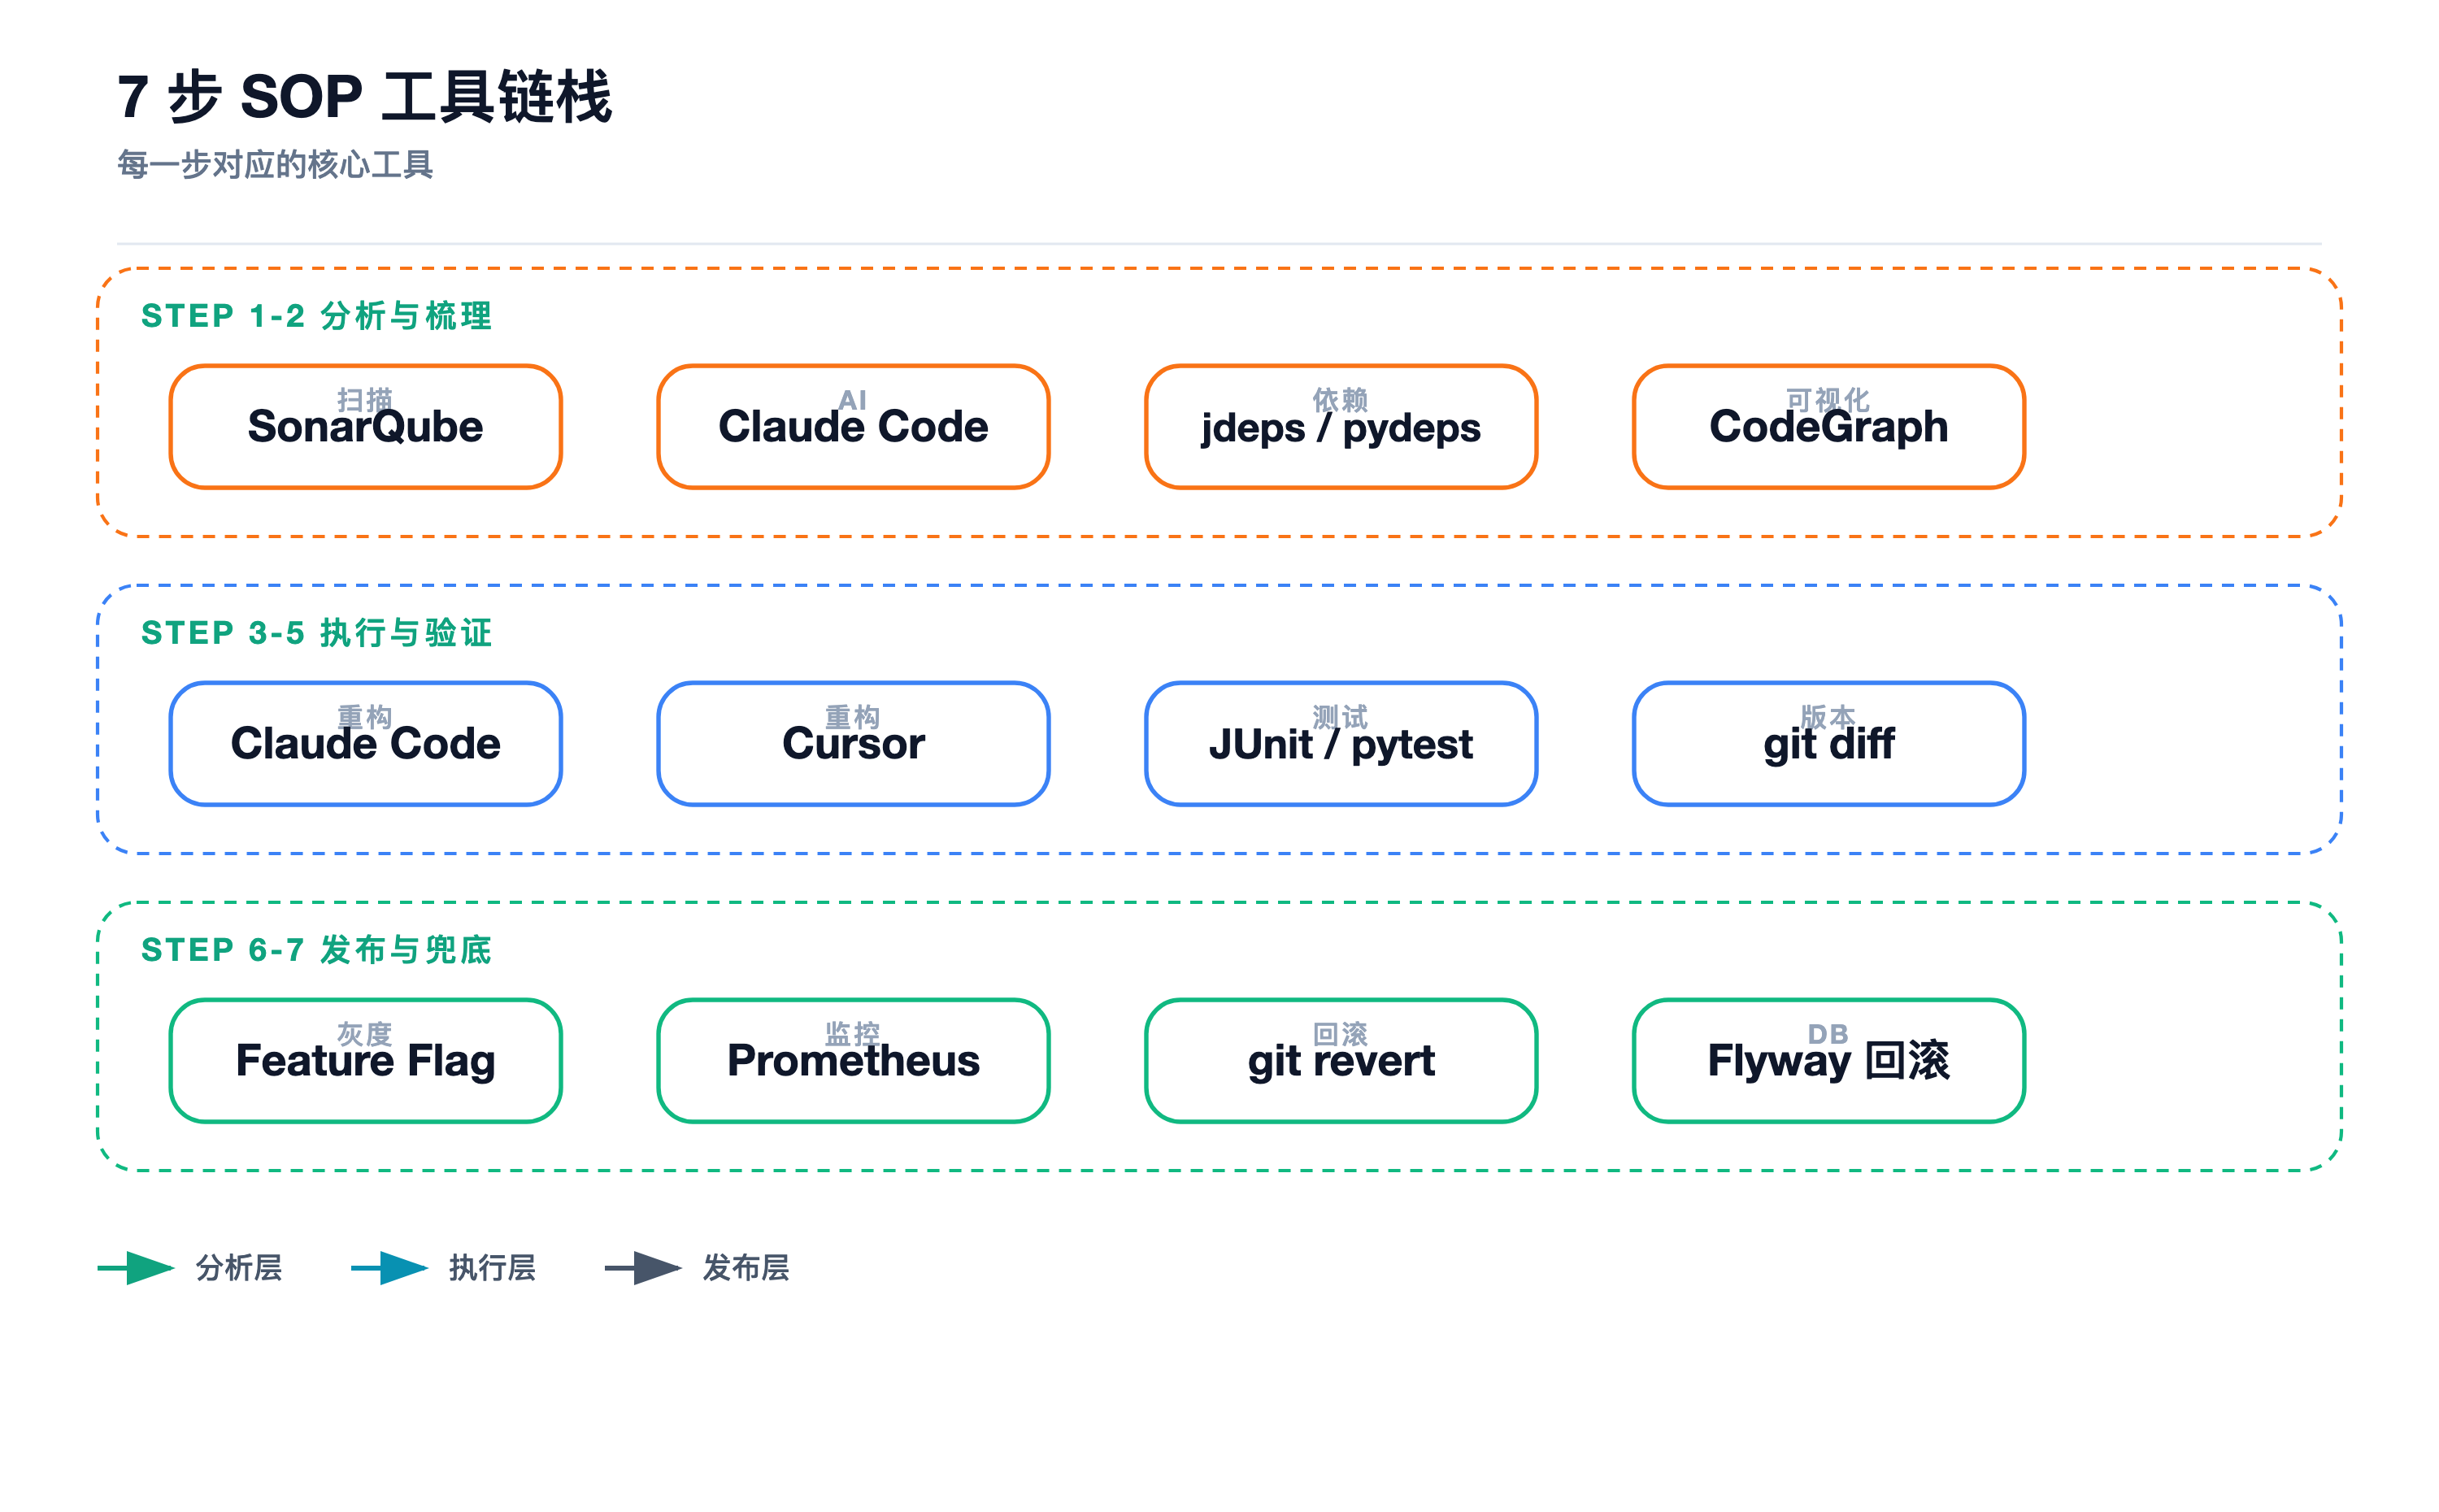
| Step 1 | Static analysis to find the real problem | Claude Code / SonarQube | Question list |
| Step 2 | Sort out runtime dependencies | Claude Code + grep | dependency graph |
| Step 3 | Refactoring in small steps, single function granularity | Claude Code | Single file diff |
| Step 4 | Write the test first and then let AI change it | Claude Code / Jest | test case |
| Step 5 | AdversarialReview | Claude Code (fresh context) | Review record |
| Step 6 | Feature flag + grayscale release | Feature Flag platform | Grayscale configuration |
| Step 7 | Rollback plan | git checkpoint | One-click rollback script |
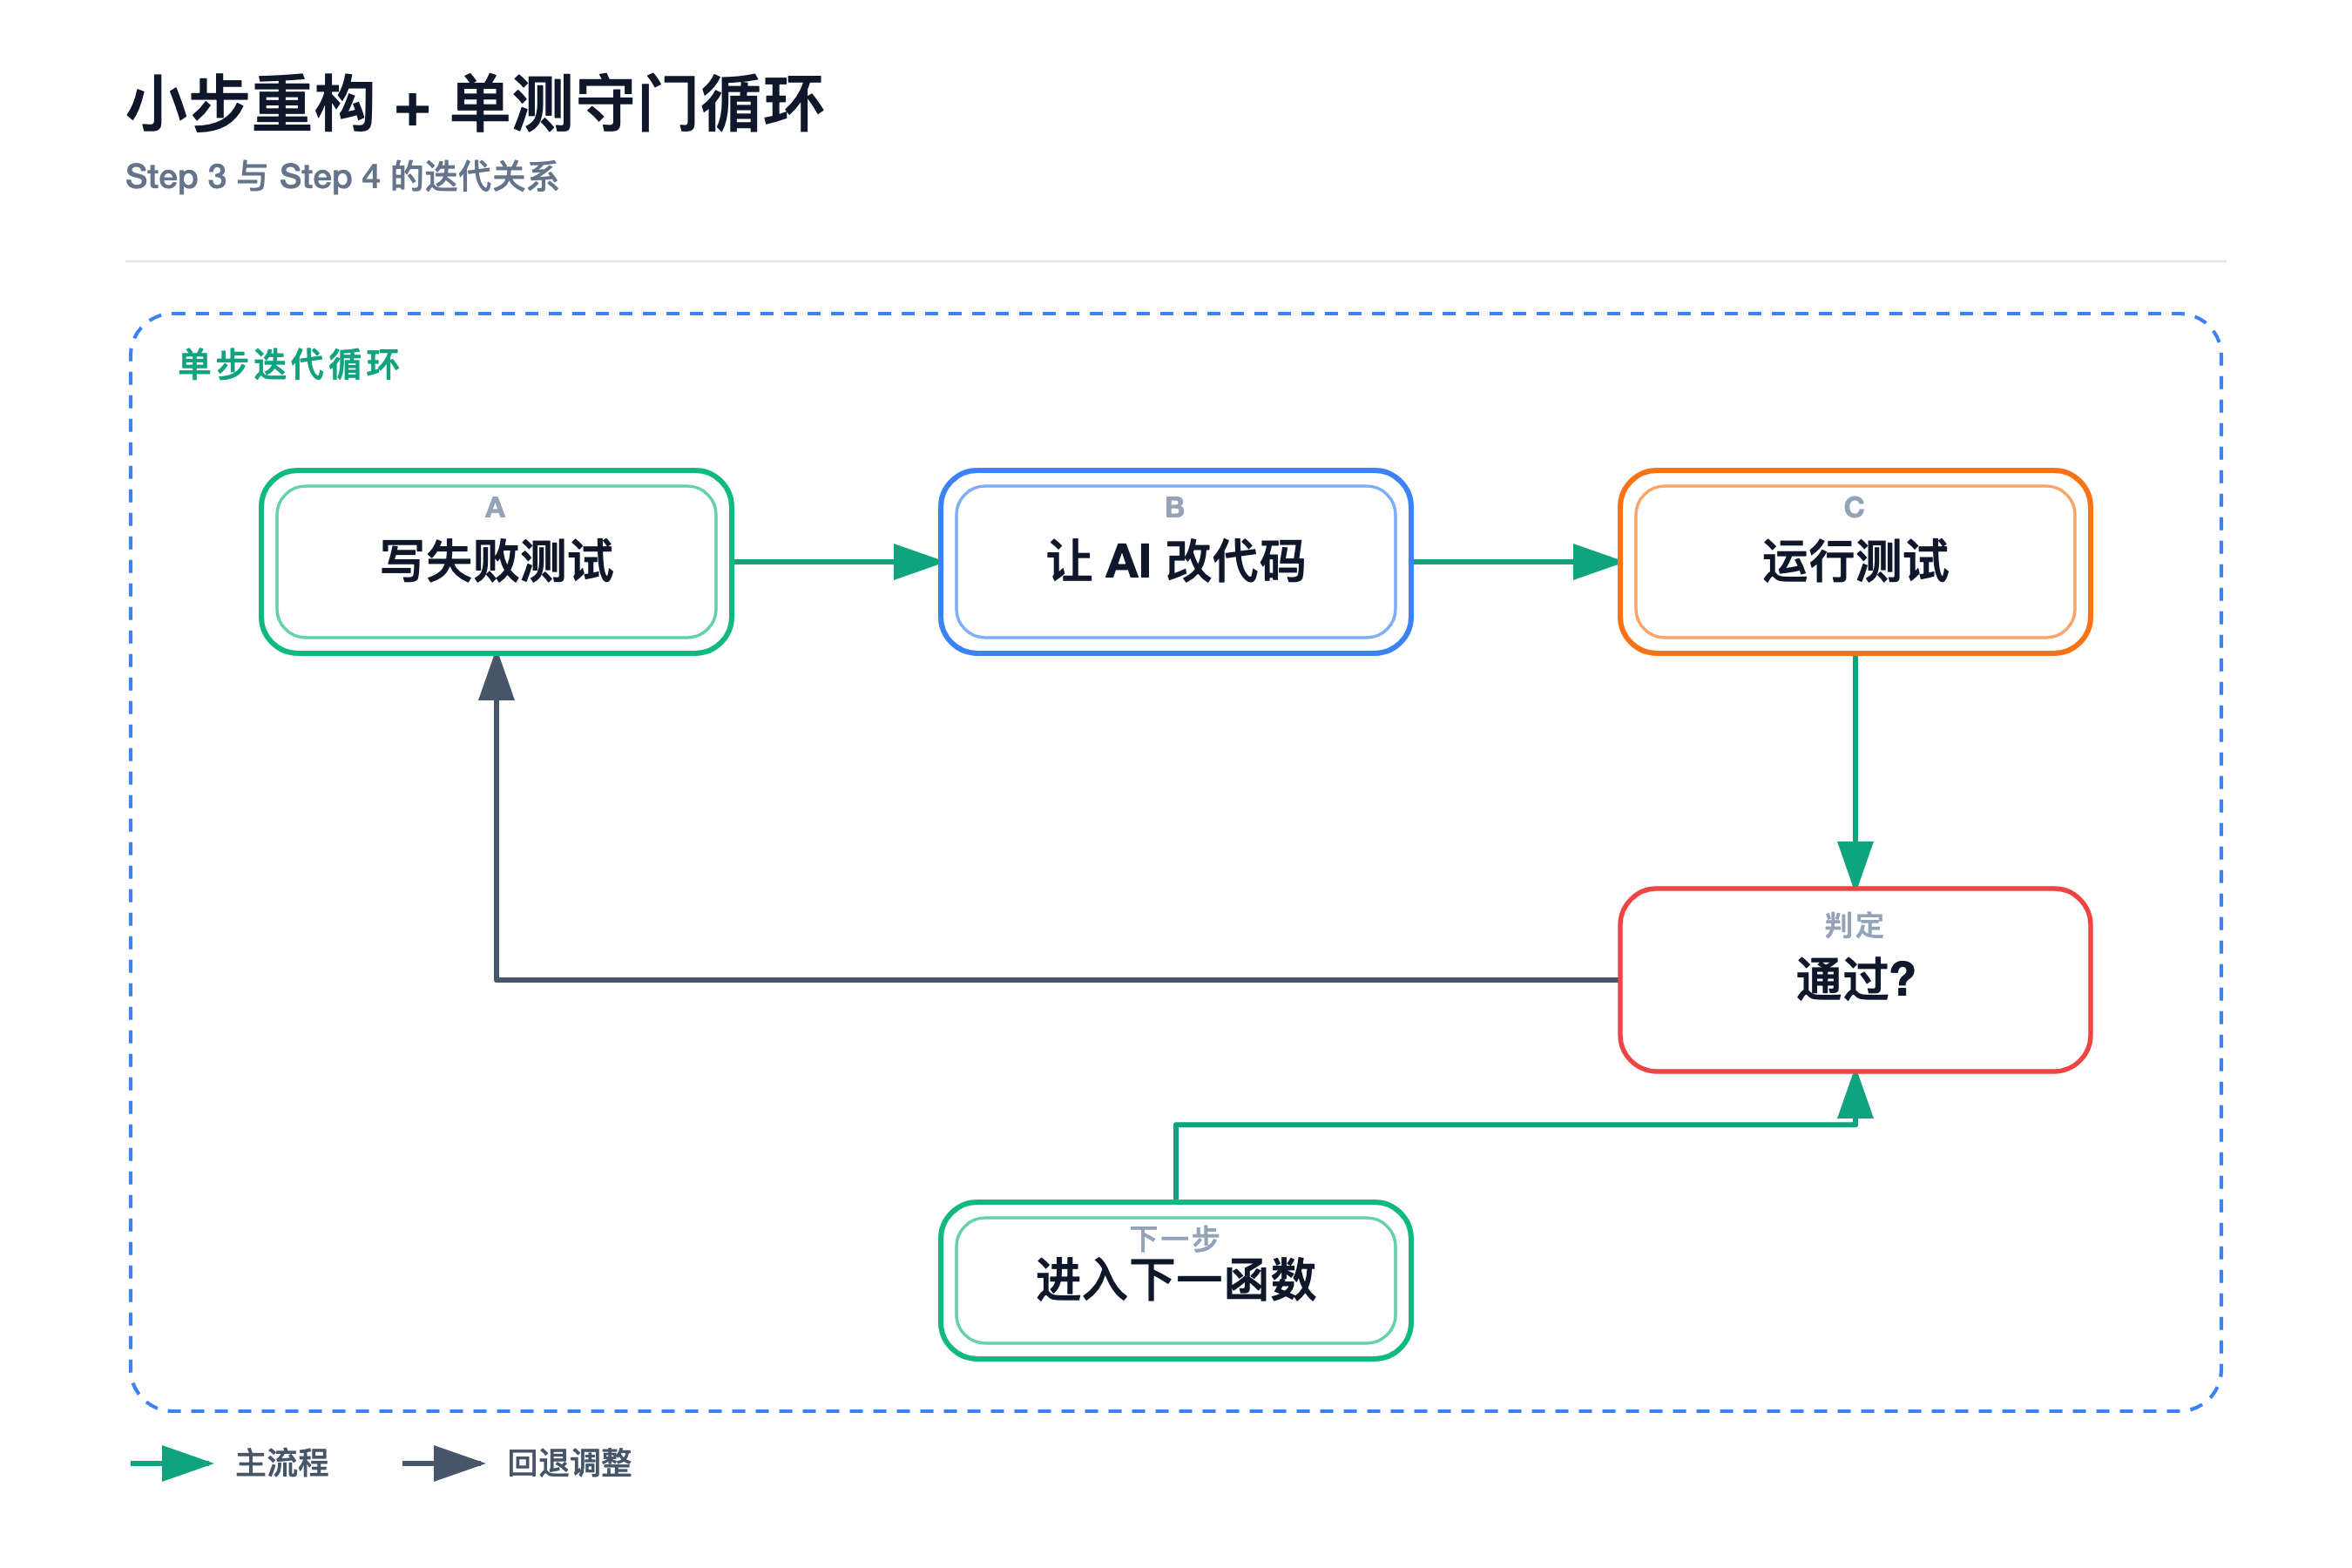
These 7 steps are not a linear pipeline. Step 3 and Step 4 are a cycle: write the single test and let AI modify it. If the test fails, go back to Step 4. Do not enter Step 5 until all single tests are passed.
Every step should have clear and verifiable outputs. Steps without output are a waste of time.
Step 1: Static analysis, use AI to scan out real problems
Many people ask AI to read the entire warehouse and “help me reconstruct it” as soon as they come up. Wrong. The first step should be to let AI serve as quality inspectors instead of construction teams.
My approach is to use Claude Code to conduct a structured scan of the target directory, classify it by severity, and give the specific location and modification suggestions for each problem.
@src/services/order-service.ts
@src/services/payment-service.ts
@src/utils/

你是一个代码审查专家。请依次完成以下任务:

1. 列出所有超过 50 行的函数,标注行号和文件
2. 找出重复代码片段(3行以上相同或高度相似的代码块),标注位置
3. 识别未使用的 import 和导出的接口
4. 标注所有 try-catch 吞异常的情况
5. 按优先级排序,只返回 Top 10 问题,格式:[P0/P1/P2] 文件:行号 → 问题描述 → 修改方向

不要给出完整代码。只需要诊断报告。
The output of this step is aQuestion listnot a suggestion for modification. With the list, you can determine which ones are real problems and which ones are caused by AI causing anxiety.
In actual use, you will find that if SonarQube or ESLint can scan things, do not let AI scan them. The value of AI lies in understanding issues at the semantic level, such as whether the function has a single responsibility and whether the naming accurately reflects the intention. These static tools cannot scan it.
Output: A prioritized list of issues, with no more than 5 P0s.
Step 2: Rely on combing and don’t touch things you shouldn’t touch
This is where I turn over the most. After the modification, the local test is all green, and it hangs as soon as it reaches the production environment. The reason is usually an implicit dependency.
Some dependence is not on you import Those, such as global cache status, configuration file reading, and environment variable override. These things cannot be seen just by looking at the code. You have to confirm how they affect runtime behavior.
@src/

帮我梳理 src/services/order-service.ts 的所有依赖关系:

1. 直接导入:列出所有 import 语句及其来源
2. 间接依赖:追踪第1步中引用的文件的 import,至少深入两层
3. 外部输入:列出该文件直接或间接读取的环境变量、配置文件路径、数据库表名
4. 副作用:标注所有对外部状态的写操作(缓存、日志、消息队列发送等)
5. 如果某个依赖只在特定条件下触发,请用注释标注触发条件

最后输出一份依赖树,根节点是 order-service.ts。
After sorting out the dependencies, you should have a clear idea:Which files can be moved and which files can only be read but not touched.
This step is often skipped. I have seen many teams directly use AI to perform batch modifications. After the modification, they found that a certain helper function was referenced by 12 files, 3 of which were still in the maintenance period. The communication cost was higher than the reconstruction itself.
Output: A dependency list distinguishing between safe and protected areas.
Step 3: Refactoring in small steps, single function granularity
Now comes the real hands-on part. The most common mistake to make at this time is to change the AI too much in one go.
My principle isOnly change one function at a time. After the changes are verified and passed, do the next one. Don’t be greedy for too much.
@src/services/order-service.ts::createOrder

我需要重构这个 createOrder 函数。它当前长度是 87 行,承担了过多职责。

约束条件:
1. 保持现有 public API 签名不变,包括参数类型和返回值
2. 提取公共逻辑为私有辅助函数
3. 每个新函数的行数不超过 40 行
4. 保留原有的错误处理模式
5. 不改变任何外部可观察的行为(日志输出、异常类型、HTTP状态码)

请先写出你的重构计划,等我确认后再生成代码。计划格式:
- 原函数拆分为哪几个新函数
- 每个新函数的职责一句话描述
- 是否有需要额外关注的边界情况
Note there is a key detail here:Ask AI to come up with a plan first and wait for your confirmation before generating code. This is not redundant. When many AI tools receive instructions such as “please modify directly”, they will skip the thinking process and output directly. Once the direction goes wrong, they have to start over. Let you confirm, it will waste up to 10 seconds, but it can prevent directional problems.
There is another small pitfall: AI often replaces the data structure inside the function on its own initiative. For example, change an array into a Map to improve search efficiency. This is the correct optimization in theory, but if this data structure is also read elsewhere (even just .length properties), the behavior will change.Don’t trust AI’s judgment on data structure unless you have complete test coverage.
Output: A single file diff that can pass unit testing.
Step 4: TDD is gatekeeper, write the test first and then let AI change it
This step is the most critical of all. Without this step, the next 6 steps are just decoration.
Many people think that TDD is used during the development phase and refactoring is not necessary. This is a cognitive misunderstanding. On the contrary,Refactoring is the only scenario where you can change the code at will without fear of introducing bugs – provided you have enough automated tests to protect you.
@src/services/order-service.ts::calculateDiscount

在这个函数当前实现之前,先为一个已有的复杂函数编写完整的单元测试。

函数信息:
- 文件名:src/services/order-service.ts
- 函数名:calculateDiscount
- 当前长度:63 行
- 主要逻辑:根据用户等级、订单金额、促销规则计算最终折扣

测试要求:
1. 覆盖所有已知分支(用户等级 A/B/C/D、金额为0、金额为null、促销叠加)
2. 包含边界值:最大金额($99999)、最小负数情况、浮点精度场景
3. 每条测试必须有清晰的名字,描述输入和期望输出
4. 使用现有的测试框架(Jest/Mocha,根据项目中已有的约定)
5. 先输出测试代码,不要修改原函数

等待我确认测试通过后,再进行下一步。
After writing the test, let AI modify the original function and run the test at the same time. If the test fails, feed the error message back and let the AI fix it. Repeat this process until all are passed.
Here’s a practical tip:If your project’s test coverage is inherently low, don’t try to fill in all the missing tests during the refactoring process. That way you’ll spend 80% of your time writing tests and 20% of your time changing code. Make sure you cover the part you want to change first, and cover other parts of the test later.
Output: A set of all passed test cases, and modified functions protected by the tests.
Step 5: Adversarial Code Review
All tests have been passed, so don’t be in a hurry to submit a PR. Start by doing a confrontational code review.
The problem with regular reviews is that the reviewer is too familiar with the code. After watching it three times, you will have the illusion that “this is no problem.” The approach of adversarial review is to let the AI act as a person who has never seen this code and use the freshest context to criticize it.
@diff

假设你是一个第一次接触这个项目的新人工程师,正在 review 这份 PR。

你没有项目的历史背景知识,也没有读过相关的设计文档。

请从以下角度进行审查:
1. 可读性:作为一个新人,你能在 5 分钟内理解这段代码在做什么吗?哪里让你困惑?
2. 正确性:有没有看起来不太对劲的逻辑?即使暂时说不清错在哪里,也请标注出来
3. 一致性:代码风格是否与项目中已有的代码保持一致?逐一对比原有代码的风格差异
4. 安全性:有没有潜在的注入风险、信息泄露或未处理的异常?
5. 性能:有没有明显的性能问题,特别是循环中的数据库查询、不必要的序列化

对于每个问题,给出你在原始代码中对应的行号和具体的担忧。不要泛泛而谈。
The output of adversarial reviews often sends chills down your spine. Not because the AI is so powerful, but because you did overlook some obvious things in the process of getting familiar with this code. This is the so-called “curse of knowledge” – you know too much, but you can’t see the problems that others will encounter.
I usually treat the review results as a checklist and manually confirm each marking point. Some AI’s judgments may be overly conservative, but that’s okay. It’s better to ask more than miss the real question.
Output: A Review record, closing or accepting each issue found one by one.
Step 6: Grayscale release, feature flag is your safety rope
The modification is completed, the review has been passed, and the test is all green. Can it be deployed directly?
no. At least it shouldn’t be pushed directly to production traffic on the master branch.
feature flag It is the simplest and most effective grayscale method. Whether you use LaunchDarkly, Unleash, or a bool switch you wrote yourself, the principle is the same: new code takes an independent execution path, does not take effect by default, and is enabled on demand.
// 在你的入口处插入 feature flag 包裹

const USE_NEW_ORDER_FLOW = process.env.FEATURE_NEW_ORDER_FLOW === 'true';

if (USE_NEW_ORDER_FLOW) {
  // 新的重构后的逻辑
} else {
  // 旧的逻辑保持不变
}

// 部署命令
FEATURE_NEW_ORDER_FLOW=true npm run build && kubectl rollout restart deployment/order-service

// 监控命令
kubectl logs -f deployment/order-service -l app=order-service --tail=200 | grep ERROR

// 快速切回旧逻辑
FEATURE_NEW_ORDER_FLOW=false npm run build && kubectl rollout restart deployment/order-service
My suggestion for Grayscale’s rhythm is this: first open it to the intranet (for team members’ own use), keep it stable for half a day without exception, then open it to 5% of external traffic, observe it for 24 hours, gradually increase it to 50%, and finally full volume. Leave enough time between each step for people to react.
Don’t bother. Tencent Cloud Computing’s experience in refactoring 200,000 lines of functions was reduced from 2,000 lines of giant functions to less than 100 lines, and the duplicate code was reduced from 35% to less than 10%. The premise that their delivery cycle can be compressed to 1.5 days is that each layer is fully verified. Just because we are small doesn’t mean we can skip verification.
Output: switchable feature flag configuration + monitoring panel.
Step 7: Roll back the plan and think about the worst-case scenario in advance
The last step is also one that many people don’t do at all: rollback plan.
Git is your best friend. Before making any large-scale changes, make a checkpoint first.
# 重构开始前
git stash push -u -m "pre-refactoring-backup"
git tag -a "before-refactoring-order-service" -m "checkpoint before AI refactoring of order-service"

# 如果出问题,一键回退
git checkout "before-refactoring-order-service" -- src/services/order-service.ts
git checkout "before-refactoring-order-service" -- src/utils/order-utils.ts

# 或者更暴力一点,恢复整个分支
git reset --hard "before-refactoring-order-service"
With the feature flag, your rollback strategy has two levels:
- Quickly stop bleeding: Turn off the feature flag, the old code will take effect immediately and no redeployment is required.
- Complete rollback: If the flag cannot be turned off (for example, a configuration error leads to a new code path), directly restore the file from the git tag and redeploy it.
I am used to posting rollback commands in the README or PR description before starting the refactoring. This way if something goes wrong, anyone (not just you) can restore the service to a healthy state within 30 seconds.
Output: a git tag, a rollback document, and a rollback command that can be executed with one click.
Integration case: 7-step journey of OrderService
Take a practical example to see the effect.
Our team recently needs to reconstruct an OrderService, which has about 1,200 lines and involves three core links: order creation, payment callback, and refund. Follow the 7 steps above:
In the first step, 47 problems were scanned, and after filtering out the noise, 14 P0/P1 remained, mainly focusing on the createOrder and calculateRefund functions. The second step of dependency combing found that order-service references 6 shared modules, of which payment-cache is used by another team and marked as a protected area. The third step begins to break down one by one, starting with calculateRefund, because this function is relatively independent. In the fourth step, 23 test cases were written, covering all edge scenarios of amount calculation. The fifth step of the adversarial review uncovered a problem: the AI changed the currency unit string from uppercase to lowercase. Although the front-end did not report an error, the downstream settlement system matched it according to uppercase. The sixth step is to get the feature flag and run in staging for a day. The seventh step is to hit the pre-refactor-checkpoint tag.
The whole process took two and a half days, which was three times slower than simply letting AI complete the changes in one go. butThere were no online incidents after the integration.and the efficiency of subsequent iterations is significantly improved.
Compared with the big pitfalls I encountered in my previous post, the reason why this time went smoothly is not because the AI is stronger, but because the process is more reliable.
FAQ
Q: Should we still do this when the single test coverage is very low?
A: It’s more important to do this. Low coverage means you have more code to protect. First make up and test the part you want to change, don’t pursue it in one go. The coverage rate can slowly climb from 20% to 60%, but the premise is that every step cannot be done naked.
Q: What should a small team do if they don’t have feature flag infrastructure?
A: A simple env var is enough. There is no need to go for a heavy-duty solution like LaunchDarkly.REWRITE_ENABLED=true Adding an if-else can solve 80% of grayscale needs. When Tencent Cloud was refactoring 200,000 lines, the core environment switching was also implemented through configuration items.
Q: Are tests written by AI reliable?
A: Not completely reliable. You need to manually review the logical completeness of test coverage. The advantage of AI writing tests is that it is fast and has a standardized format, but the disadvantage is that it may not necessarily understand business semantics. Think of it as an efficient first draft generator, not the final judge.
Q: Can this process be used for small refactoring?
A: If you only change one or two functions in a file, it can be simplified. But at least keep Step 4 (single test goalkeeping). Other steps can be tailored according to actual conditions. The core principle is: the steps that can prevent rollover should not be discounted, and the parts that are not easy to roll over can be omitted.
Q: How often is a reasonable time to refactor?
A: There is no standard answer to this question. My experience is that as long as static analysis finds that the duplicate code rate exceeds 12% or there are clear P0 problems (such as functions exceeding 100 lines), it should be arranged. Don’t wait until all indicators turn red before taking action. By then, the interest on technical debt will already be very high.
write at the end
The issue of AI code reconstruction is not essentially a technical issue, but an engineering management issue.
Tools get better and better, that’s a fact. Anthropic itself said that the context window is a bottleneck, and major manufacturers are trying their best to increase it. But no matter how great the context, AI’s understanding of business logic can never replace a human engineer. What it can do is speed up execution if you already have a clear plan, rather than deciding which direction to go in for you.
If you are also using AI for reconstruction, try this 7-step SOP. There is no need to copy everything from the beginning. You can start from Step 4 – write the test and then let the AI modify it. This one action can prevent most rollovers.Follow me, next week I will dismantle an article on how to use SonarQube + Claude Code linkage for continuous reconstruction, the content is more practical. If you have colleagues around you who are being tortured by bugs caused by AI reconstruction, forwarding this article to them will save you at least two days of detours.
Add me on WeChat and join the exclusive technical group. Readers are welcome to provide comments. If you like it, please follow the blog and personal public account: Code Byte