Abstract: This article introduces a Claude Code custom status bar tool claude-code-statusline, and explains the installation and access to Claude Code, configures the display model, Git, context, token and task time, etc., and configures the main status bar, sub-Agent rows and optional real-time indicators through the terminal interface or CLI.
1. Why add a status bar to Claude Code?
When using Claude Code to do tasks, in addition to looking at the response content, we will also care about: what model is currently used, which directory is being operated, whether there are changes in the Git workspace, how much context is left, and how long the task has been running.
claude-code-statusline This tool collects this information at the bottom of the session and provides a configurable sub-Agent status line. The main column supports 60 display items, and the sub-Agent row supports 14 display items. You can select and sort according to your own working habits.
When starting out, it’s enough to keep the model, directory, Git, context margin, and task time. Let’s start with the installation and gradually create a set of interfaces that can be used daily.
2. Prepare the environment and complete the installation and access
2026.10.18 Update: TypeScript refactoring and npm installation
Warehouse is used TypeScript refactors the original Python implementation. from v3.0.0 Initially, the software package will be distributed through npm. Subsequent new versions will no longer support installation or updates through pipx; the Python/pipx method is reserved for historical versions.
| Tool version | Installation and update methods | Package name |
|---|---|---|
| v2.0.0 and before | Python + pipx; the last version supported by pipx is v2.0.0 | fbincon-claude-code-statusline |
| v3.0.0 and later | Node.js + npm; the first official version distributed by npm is v3.0.0 | @fbincon/claude-code-statusline |
Users who have pipx installed, please read the new “Migrating from Python/pipx to npm” in Section 7 before switching the installation method.
1. Prepare a new version of the operating environment
| platform | Operating environment |
|---|---|
| Linux / WSL | Node.js 22.x or 24.x, x64 |
| Windows 10/11 | Node.js 22.x or 24.x, x64 |
| macOS 14+ | Node.js 22.x 或 24.x,Intel / Apple Silicon |
Windows ARM devices use x64 Node emulation; native Windows ARM64 and 32-bit runtimes are currently not supported. WSL users install within WSL and use Claude Code in the same environment.
First prepare Node.js, npm and Claude Code CLI, check in the terminal:
node --version
npm --version
claude --version
To display Git information, you also need to let git --version normal operation. The new npm package already contains native dependencies for supported platforms, and no Python, pipx or compiler is required for normal installation and operation.
2. Install npm package
To install a new version for the first time, execute in Bash, Zsh or PowerShell:
npm install --global --ignore-scripts @fbincon/claude-code-statusline
After installation, make sure that npm’s global command directory is in PATH; adjust PATH and reopen the terminal.
The running command is still claude-statusline。Use the npm entry for Windows claude-statusline.cmdthe new steps in this section and the general configuration commands in the following are replaced by this; in the original text claude-statusline.exe Corresponds to historical Python/pipx installations.
3. Connect the new version to Claude Code
Execute in the terminal in sequence; Windows replaces the command name with claude-statusline.cmd:
claude-statusline --version
claude-statusline install --dry-run
claude-statusline install
claude-statusline doctor
--version Confirm that the actual running version is the new version;install --dry-run Preview access changes;install Write the Claude Code access of this tool;doctor Check the environment and access status.After npm installs the software package, you still need to perform the access steps.. After passing the check, restart Claude Code on the trusted terminal and load the status bar, commands and plug-ins.
The two editor entries on the compatible host are enabled by default, and the existing explicit shutdown preferences are retained; the default values for new installations of native timing and advanced real-time acquisition are updated in Section 6. If you encounter a conflict with an existing status bar or entry with the same name, follow the new conflict handling instructions to check the ownership and handle it later.
The following retains the original Python/pipx installation and access content, which is applicable to v2.0.0 and before. To explicitly install the last Python version, execute pipx install "fbincon-claude-code-statusline==2.0.0";This path will not install the new version of npm.
1. Check the pre-environment
| platform | Python environment |
|---|---|
| Linux / WSL | Python 3.10+ |
| Windows 10/11 | CPython 3.10–3.14, x86/x64; automatically install windows-curses dependency |
| macOS 14+ | Provides curses for CPython 3.10–3.14, Intel/Apple Silicon |
Windows ARM devices can use x64 Python emulation, and native ARM64 Python is currently not supported. WSL users complete the installation within WSL and use Claude Code in the same environment.
Check Python in Linux, WSL, macOS terminal:
python3 --version
Windows PowerShell uses Python launcher check; available when launcher is not installed python --version:
py --version
You also need pipx, which is used to manage this command line tool. If the environment is missing, follow the Python official download page to select the supported version in the table, follow the pipx official installation instructions to complete the installation, and then check:
pipx --version
claude --version
To display Git information, you also need to let git --version can operate normally.
2. Install the software package
The following one-line command works in Bash, Zsh and PowerShell:
pipx install fbincon-claude-code-statusline
pipx ensurepath
after executionReopen the terminalfor the PATH update to take effect. The installation package name is fbincon-claude-code-statuslinethe running command is claude-statusline. Windows Replace the command name below with claude-statusline.exethe parameters are the same.
3. Access Claude Code
Execute in the new terminal:
claude-statusline --version
claude-statusline install --dry-run
claude-statusline install
claude-statusline doctor
The first confirms that the tool is available;--dry-run Preview access modification;install Write access configuration;doctor Check the current environment and integration status. Software package installation and Claude Code access are two steps.
After passing the check, restart Claude Code on the trusted terminal, and a status bar should appear at the bottom. If there is already a third-party status bar or configuration entry with the same name, follow the conflict handling instructions first.
3. First understand the information in the status bar
| information | main meaning |
|---|---|
| Model and effort | Current model, and the intensity of thinking provided by the host |
| current directory | The working directory of the current session |
| Git | Branches, commit gaps with upstream, workspace changes |
| Context remaining | The remaining proportion of the current context window |
| Usage limit | Five-hour, weekly or gateway credit provided by the host |
| Token | Cumulative recorded input, cache, and output usage of the current session |
| Task total time | The total elapsed time of the current or most recent human task |
in Git ↑N、↓N Indicates the number of submissions leading and lagging the upstream;●N is the number of temporary files,~N is the number of unstaged files,?N is the number of untracked files,!N is the number of conflicting files. Non-Git directories will omit this item.
Context 73% left Indicates that approximately 73% of the context window remains. It is counted separately from account limits and session accumulated tokens.tokens middle,hit is cached read input,miss is the sum of normal input and cache creation,out is the output; statistics contain discoverable sub-Agent transcripts.
Task timing includes queuing, user waiting, the work of the sub-Agent and the end of the main Agent.⏱ means running,✓ means success,■ Indicates interruption,✗ Indicates failure. If you need to exclude verified users from waiting, you can choose another option. task-active-timer;Only displayed when the native timing observation is complete.
These fields rely on host input or local records and may be omitted if missing. See display items and indicator definitions for complete caliber.
4. Adjust the display content through the terminal interface
1. First use independent TUI configuration
Run in a real terminal outside of Claude Code:
claude-statusline configure
The window needs to be at least 64×18. After entering, you can see four pages:
| page | use |
|---|---|
| Main | Select the main status bar item and adjust the order |
| Subagents | Configure sub-Agent independent lines |
| Settings | Set colors, formatting, table of contents styles, refresh behavior, and presets |
| Layout | Set branching, entry priority and maximum width |
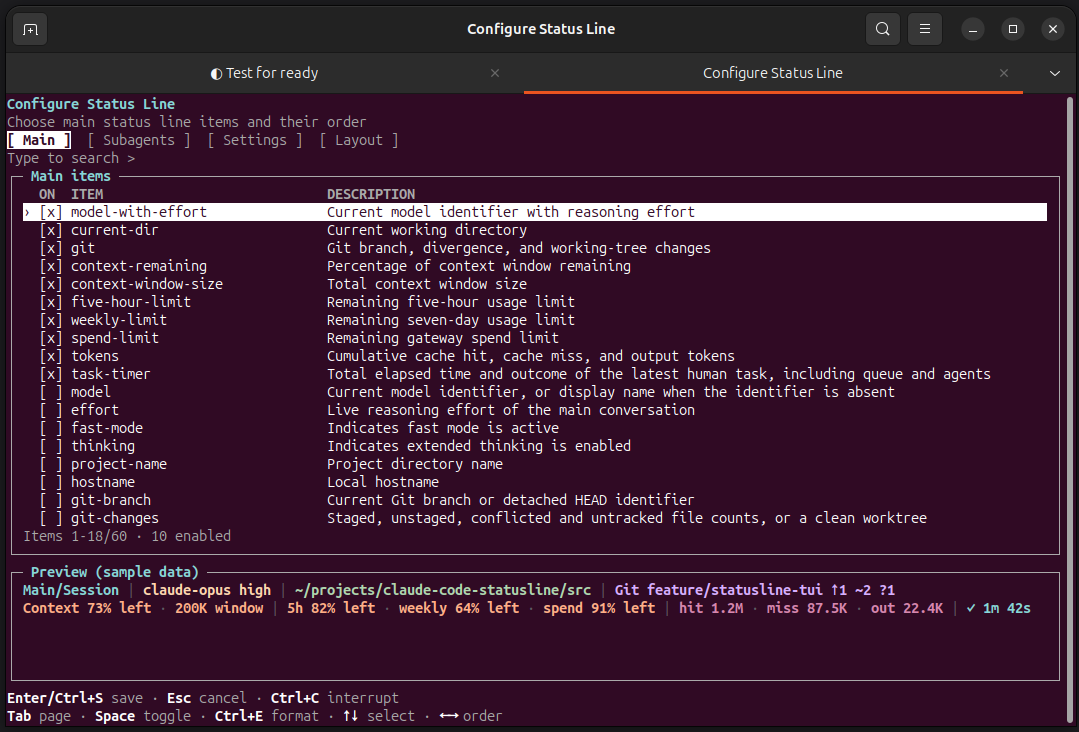
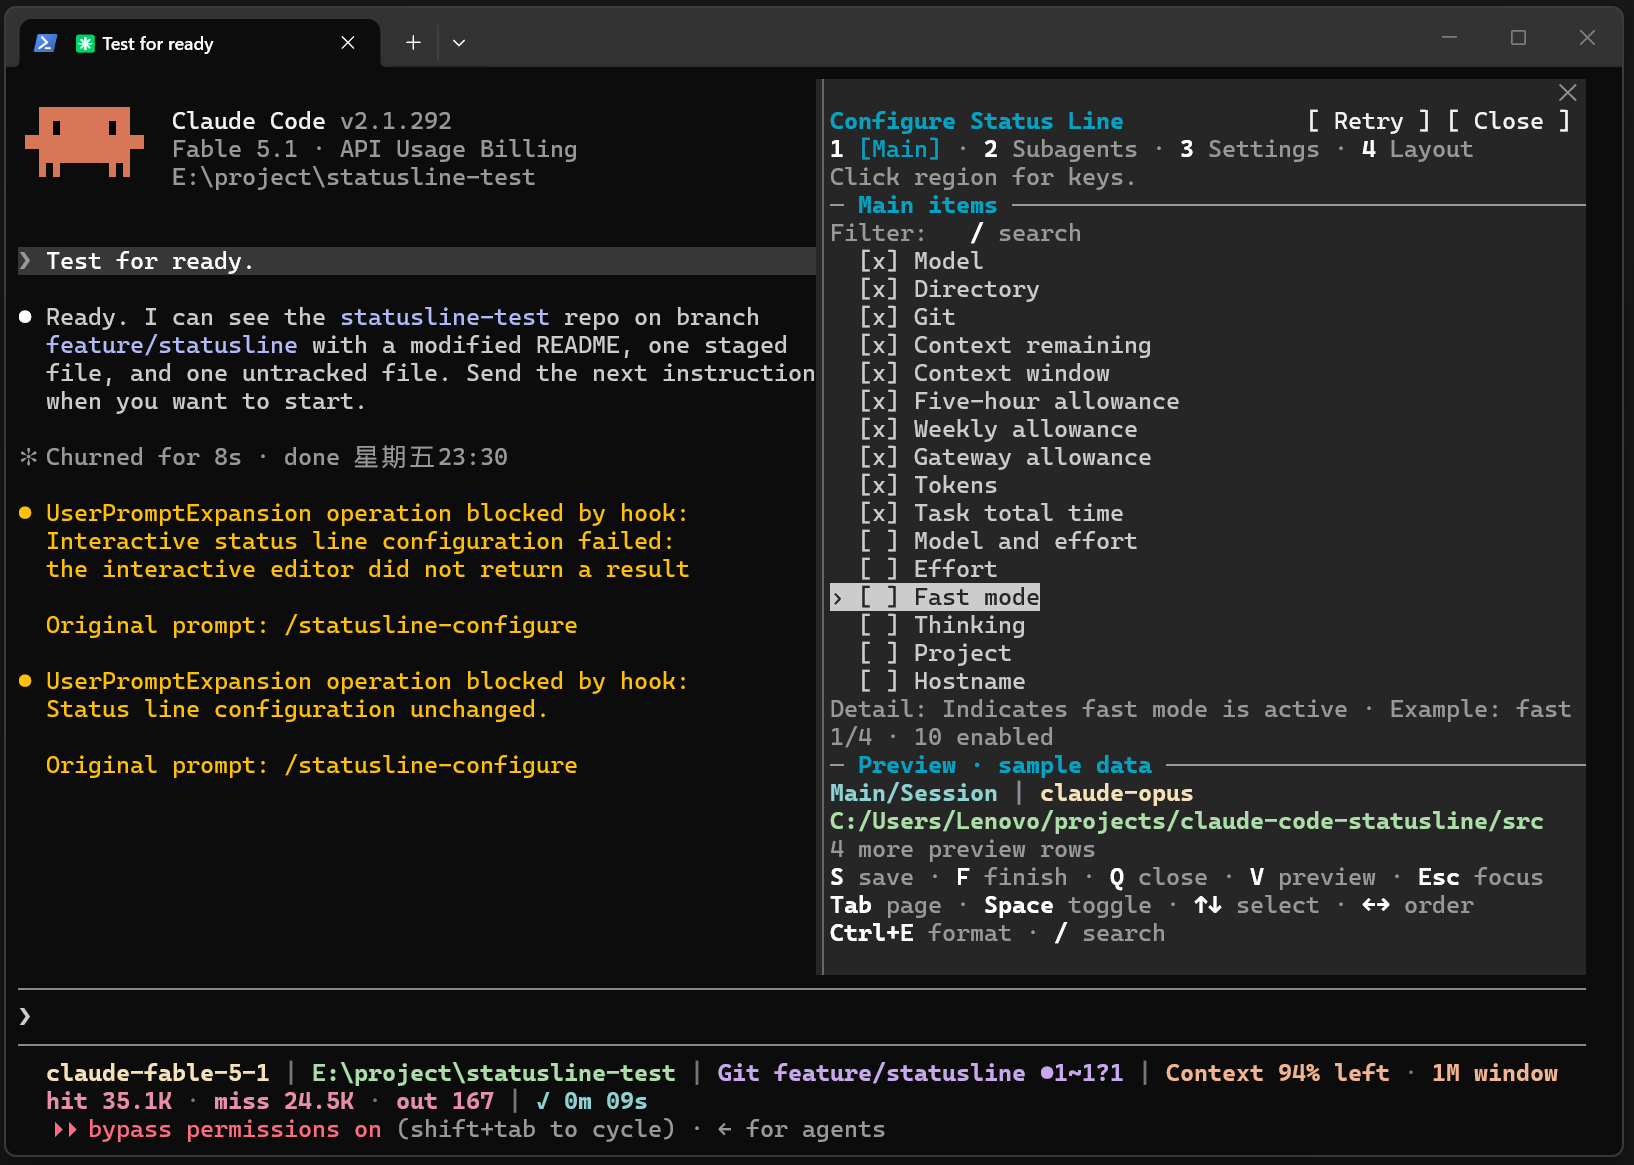
Figure 1: Main page. The Preview below uses fixed sample data for checking layout.
You can first select an entry on the Main page, use the Space switch, and then use the left and right arrow keys to adjust the order; enter text to filter the entries. When you need to modify a single label, icon or format, select it and press Ctrl+E.
| Independent/external TUI button | operate |
|---|---|
| Tab / Shift+Tab | Switch page |
| ↑ / ↓、Space、← / → | Select, switch, sort or adjust setting values |
| Ctrl+E / Ctrl+G | Open itemized format/return or cancel entry |
| Ctrl+S | Save the complete draft after completing field entry |
| Esc | Cancel input first; abandon draft and exit when not in input state |
Enter saves on project pages and is used in advanced fields to edit or confirm entries.To save the entire configuration, use Ctrl+Seasier to remember. After returning to Claude Code, the next status bar refresh will use the new configuration.
2. Start the configuration in Claude Code
Enter the following two commands into Claude Code sessionchoose one as needed:
| Order | open location | Claude Code version |
|---|---|---|
/statusline-configure |
Open the same TUI in supported external terminals | 2.1.258+ |
/statusline-configure-native |
Client configuration panel within the current session | 2.1.287+ |
External entry uses tmux or GNOME Terminal on Linux, tmux or Terminal.app on macOS, and new console on Windows; use standalone when the launcher is unavailable. configure。
After the in-session Client is opened, first click on the panel area and then use the keyboard. The way it is saved is S save and leave page, F save and exit, Q discard unsaved changes; Use Ctrl+G to cancel field input. Just follow the instructions at the bottom of the page.
Each portal shares the current user’s configuration and takes effect on the Claude Code project in the configuration directory./statusline-config Then the question and answer configuration is provided and the model round is used; the status bar rendering itself reads the host input and local status without initiating additional network requests or consuming model tokens.
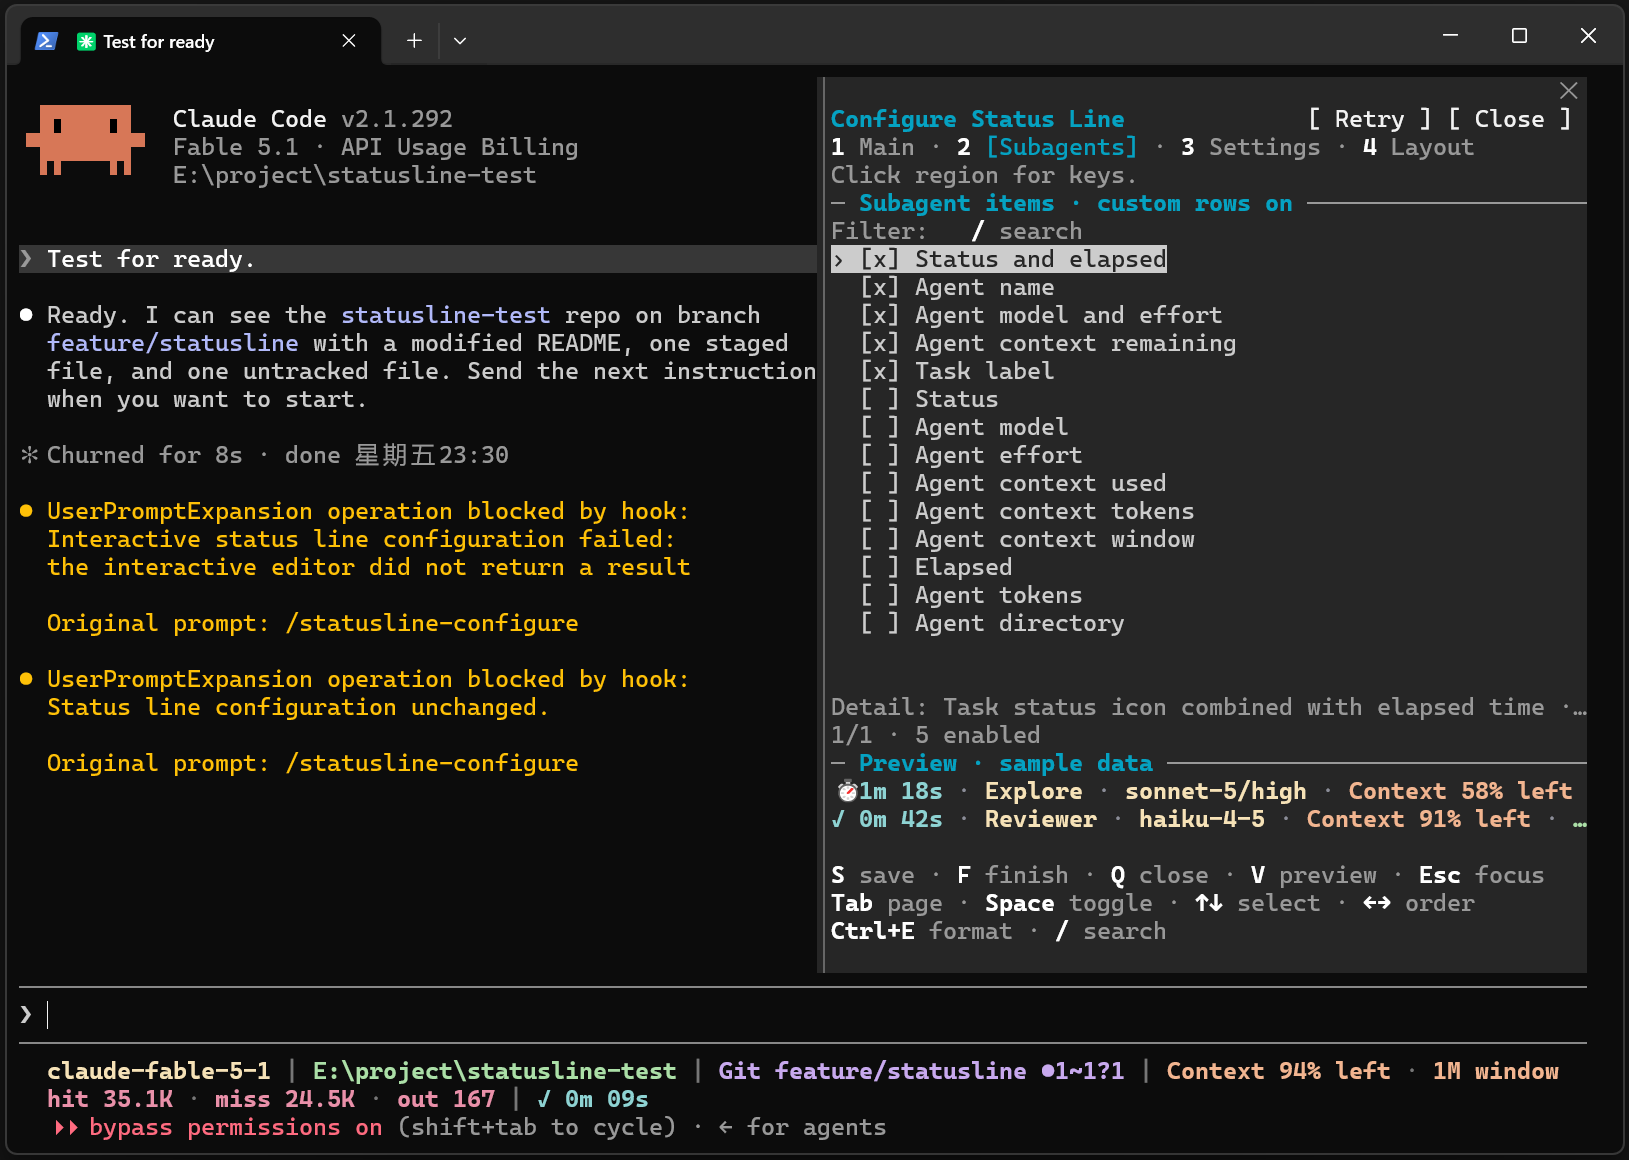
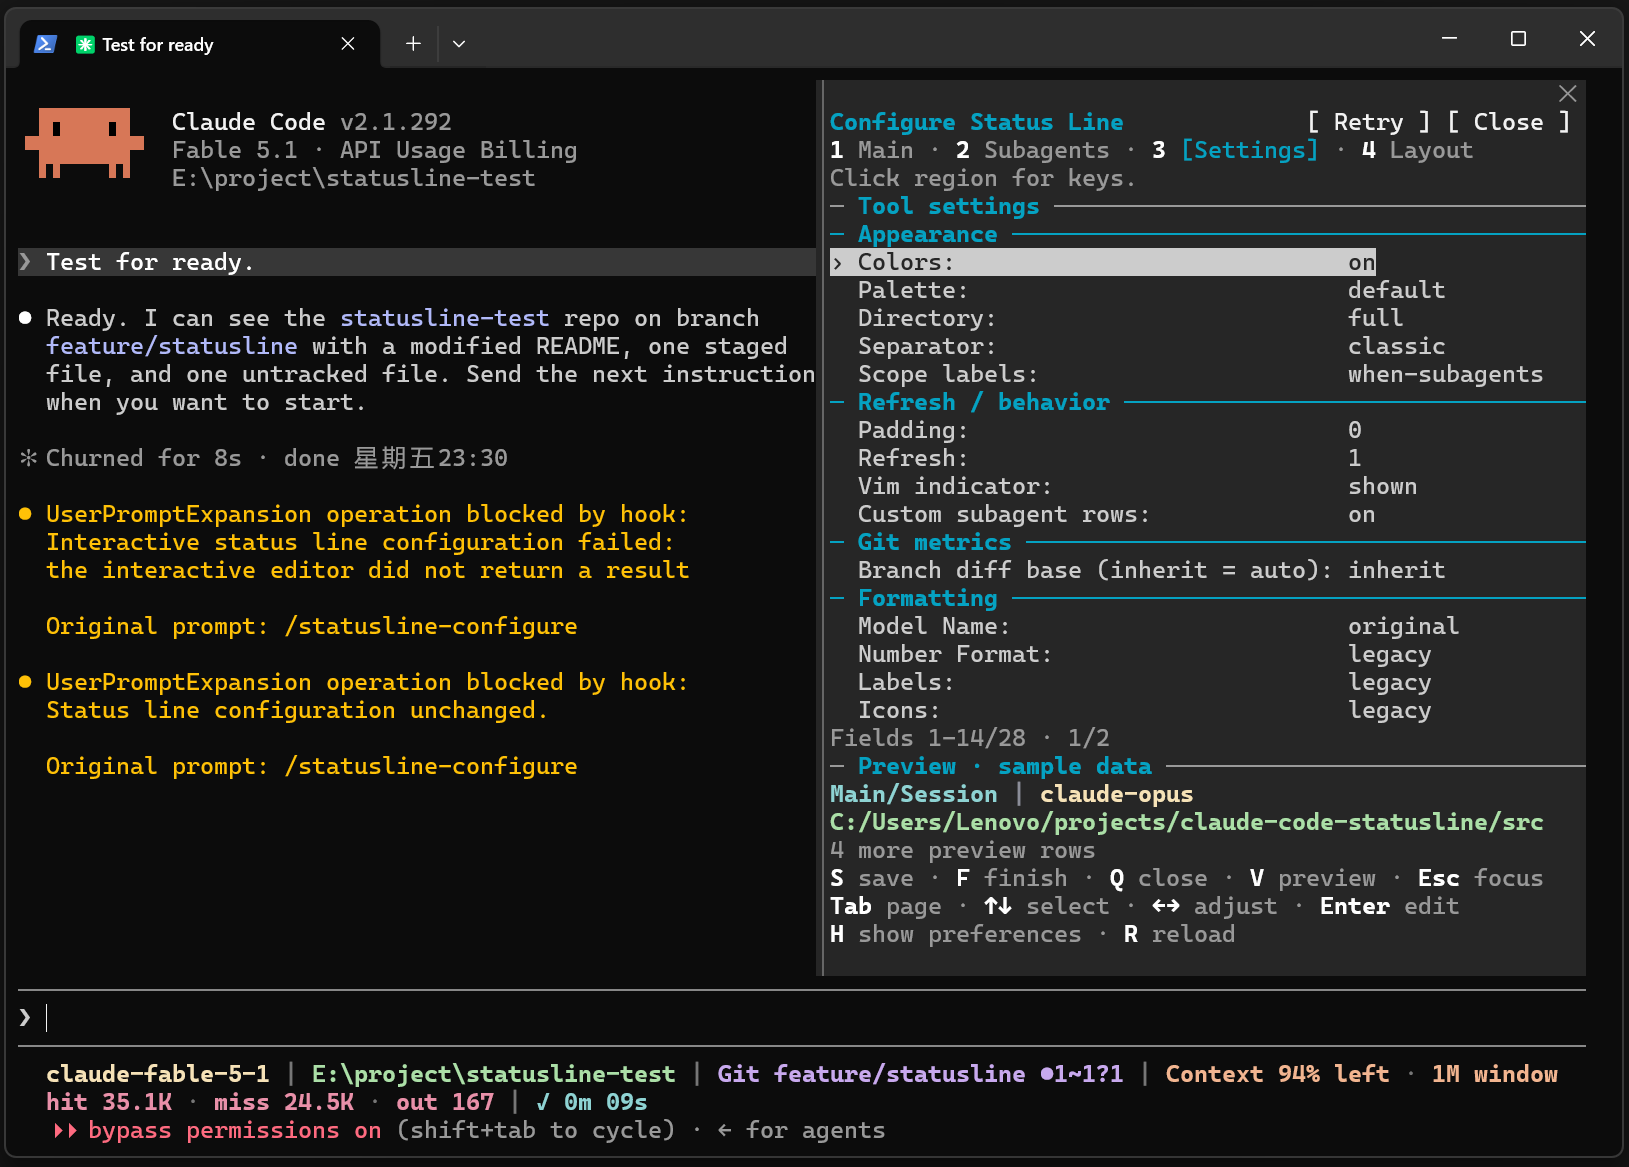
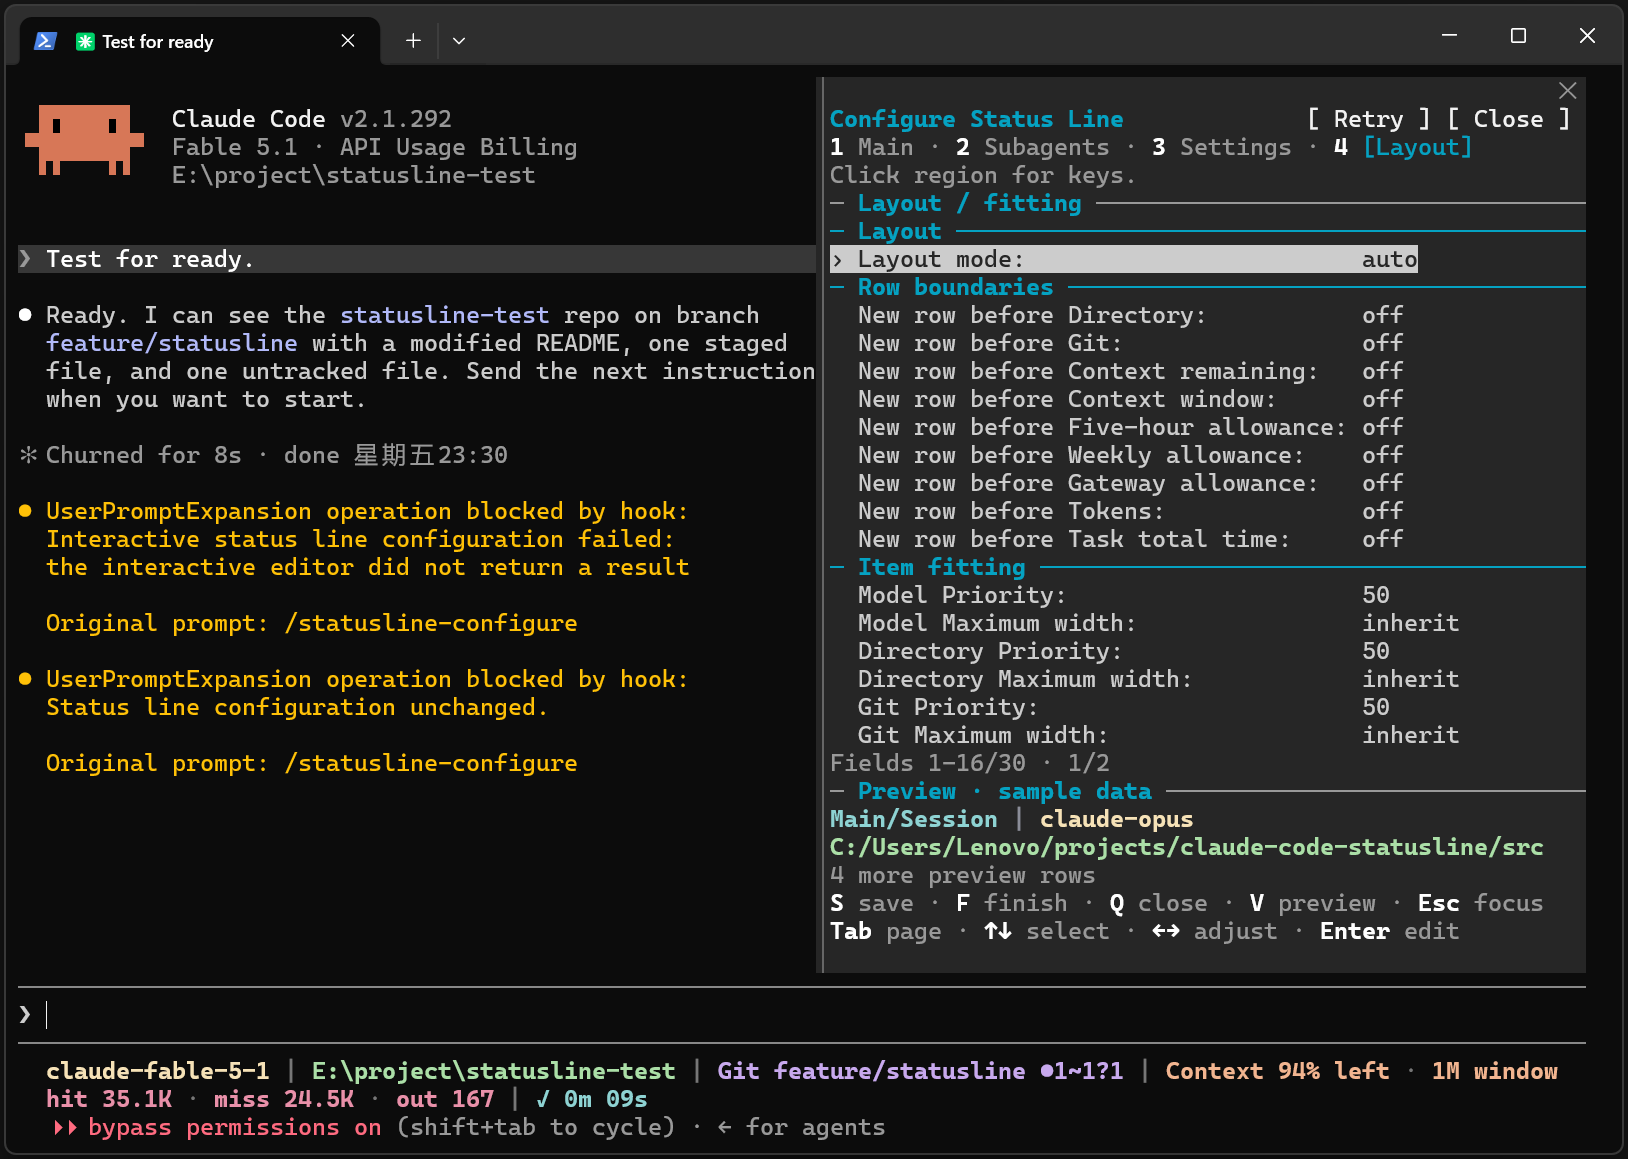
The following shows the in-session configuration panel by platform, click on the corresponding title to expand. in the screenshot Preview is fixed sample datathe main status bar at the bottom of the session displays session data.
Linux: Main, Subagents, Settings, Layout within the session (click to expand)
Main: Select the main status bar entries and adjust their order.
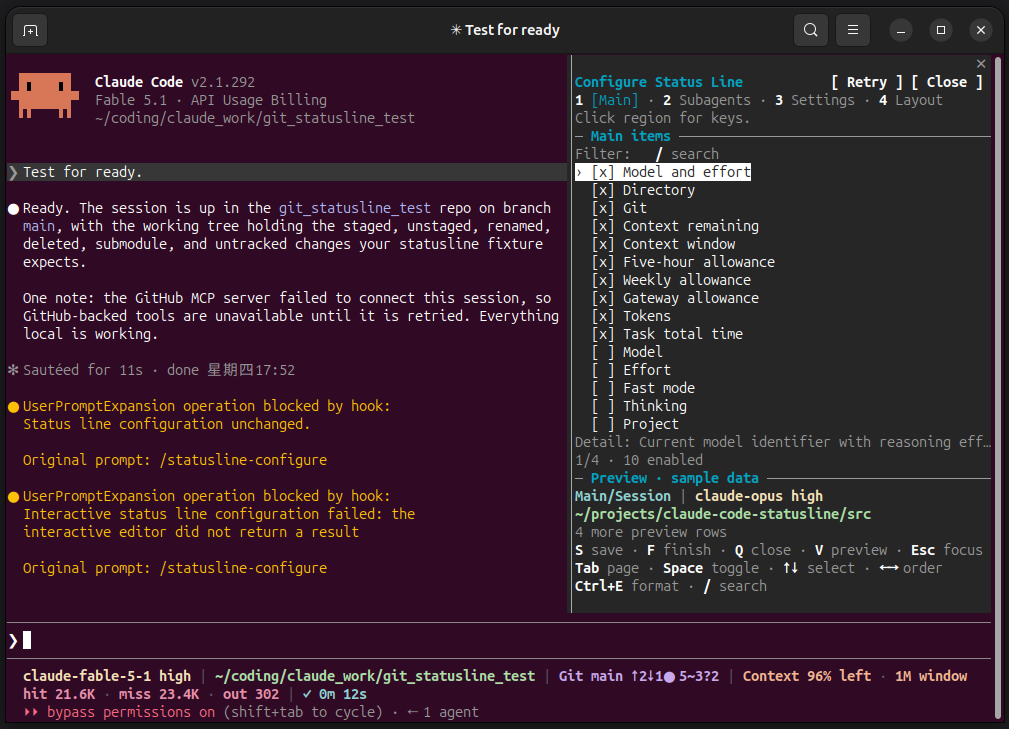
Subagents: Configure sub-Agent independent rows and entry order.
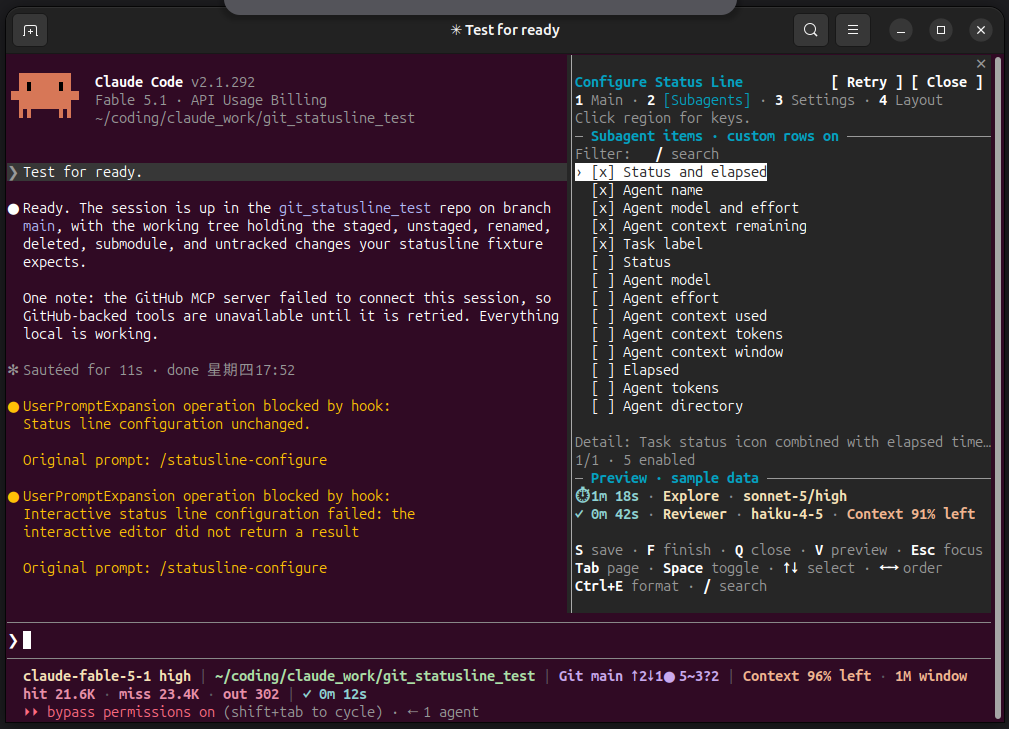
Settings: Adjust appearance, refresh behavior and display format.
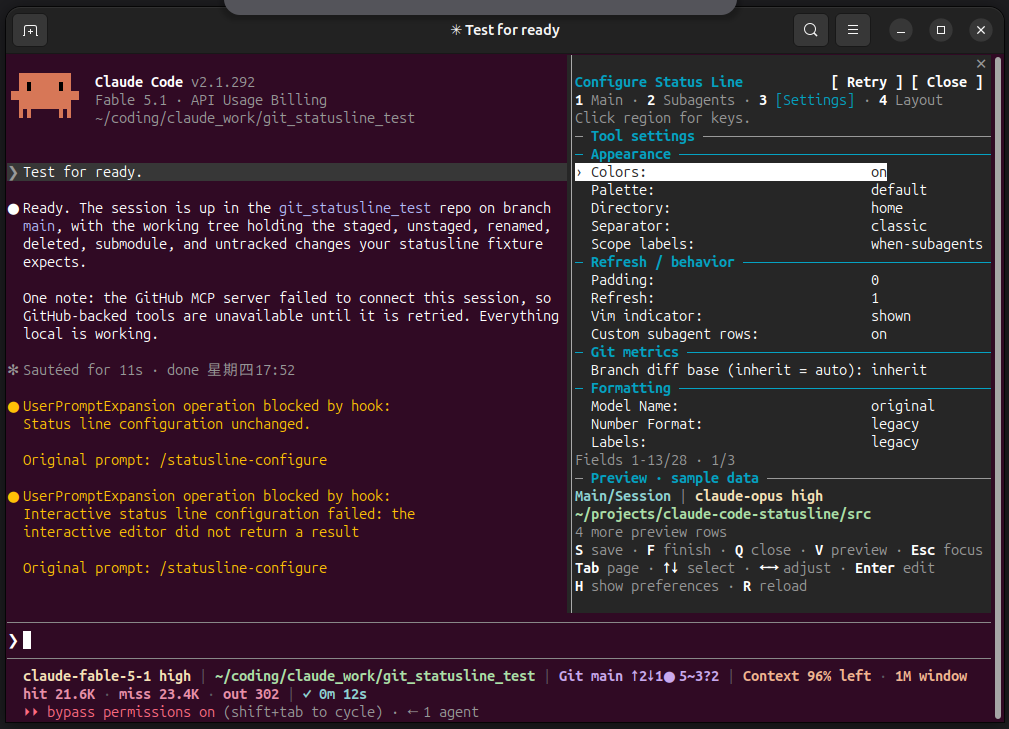
Layout: Set rows, entry priority and maximum width.
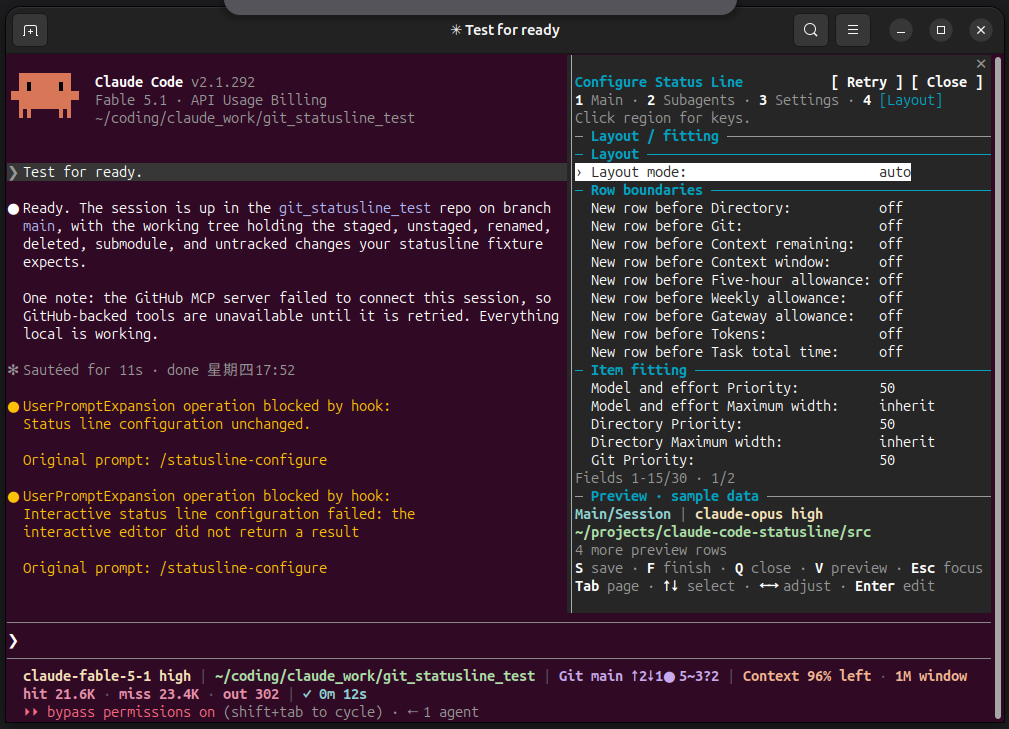
Windows: Main, Subagents, Settings, Layout within the session (click to expand)
Main: Select the main status bar entries and adjust their order.
Subagents: Configure sub-Agent independent rows and entry order.
Settings: Adjust appearance, refresh behavior and display format.
Layout: Set rows, entry priority and maximum width.
macOS: Main within a session (click to expand)
Main: Main status bar entry configuration and sample preview.
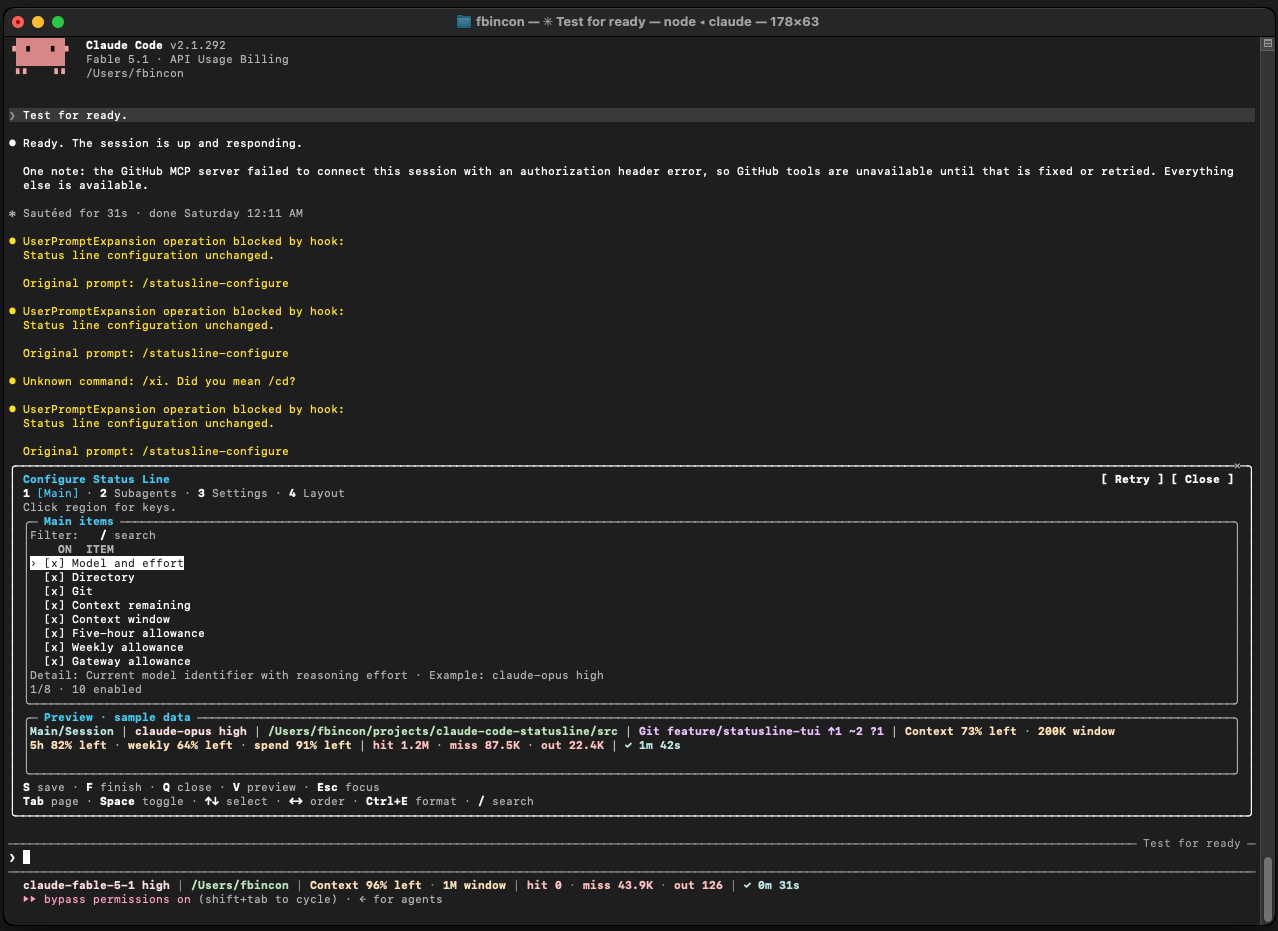
Currently only Main screenshots are provided. The client within the macOS session still has recorded input interaction restrictions. Taking screenshots does not mean that the problem has been solved. When you encounter operational problems, you can use it in a separate terminal. claude-statusline configure。
5. Three groups of configurations that can be used directly
The following commands are executed in the system terminal. The first two groups are the two choices for the main column, and the third group configures the sub-Agent row separately.set-items meetingReplace this column to enable collection and determine order;Use when you want to add an item enable。
1. Simplified development view
claude-statusline config set-items model-with-effort current-dir git context-remaining task-timer
claude-statusline config set directory-style home
claude-statusline config set separator-style compact
claude-statusline config show
This group holds the model, directory, Git, context margin, and task time.home will abbreviate the home directory prefix to ~,compact Use compact delimiters;show Save results can be confirmed.
If you want the main column to be divided into two rows, then execute:
claude-statusline config layout explicit model-with-effort,current-dir,git context-remaining,task-timer
Each parameter represents a line, and commas connect the same entries in the same order as the entries just enabled. You can also set row boundaries on the Layout page, assign higher priority to important items, and limit the width of long directories.
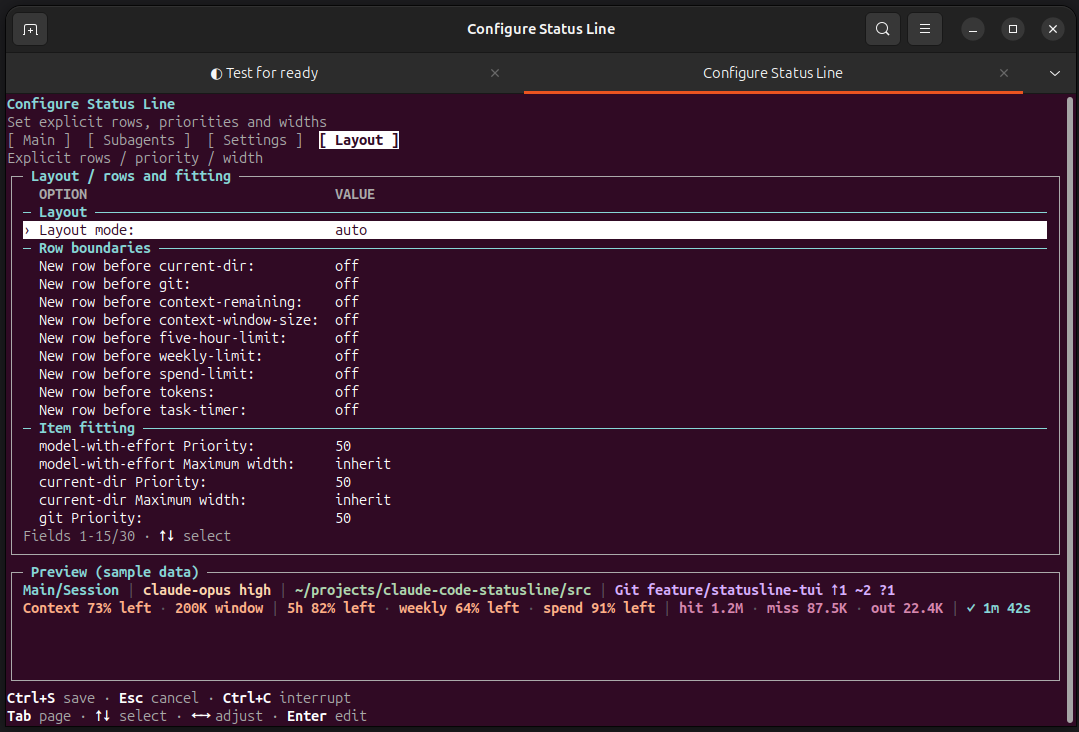
Figure 2: Layout page; the Preview in the screenshot is sample data. Automatic layout wraps lines, and explicit layout truncates at the limit when width is insufficient and condenses low-priority items.
2. Limit and token view
claude-statusline config set-items five-hour-limit weekly-limit spend-limit tokens
claude-statusline config layout auto
Suitable for scenarios where usage is the main concern.spend-limit Rely on the quota data provided by the host and gateway. If the account or endpoint is not provided, it will be omitted; selecting the display item will not make the missing data appear automatically.
3. Sub-Agent status line
The sub-Agent line requires Claude Code 2.1.205+, and the task-by-task effort requires 2.1.214+. Custom rows are enabled by default and can be set to:
claude-statusline config subagents set-items status-elapsed name model-with-effort context-remaining task
claude-statusline config set subagent-hide-completed on
claude-statusline config set subagent-row-limit 6
When a real task runs a sub-Agent, each row displays the status and duration, name, model, context and task label of the corresponding task. The above settings hide completed proxies and display up to six lines. The main column still belongs to the main session, and each sub-Agent row uses its own task data; the sub-Agent’s tokens Indicates context occupancy.
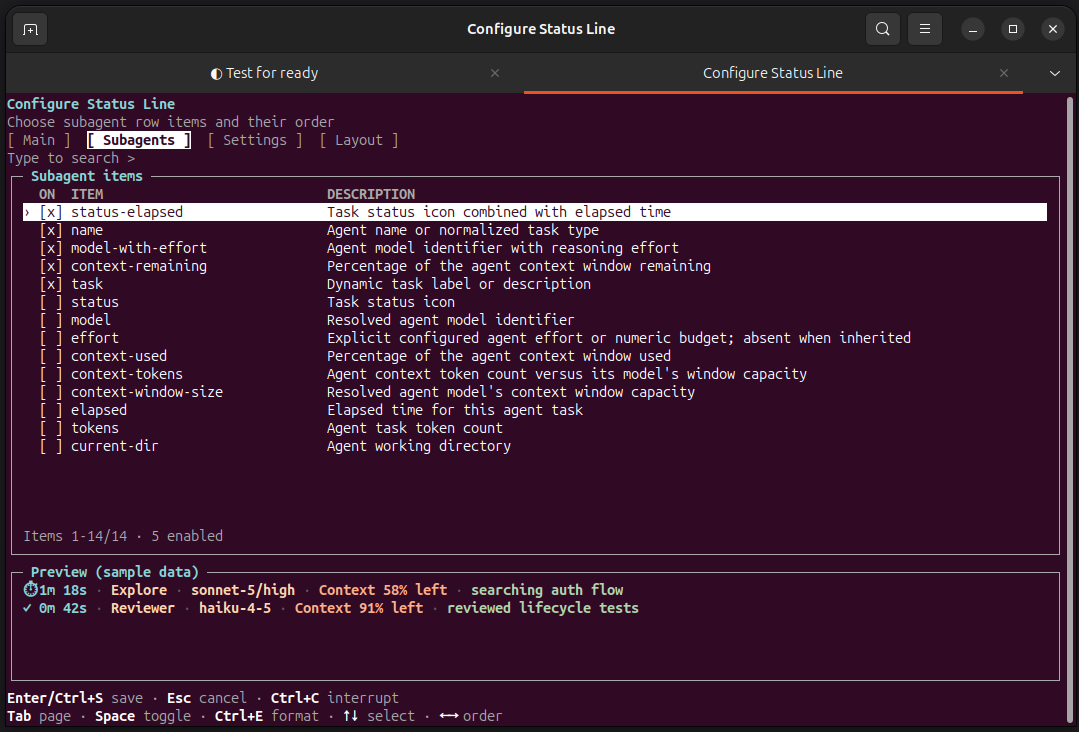
Figure 3: Subagents page and sample preview, showing the configurable content of the sub-Agent row.
4. Start with the presets and save your own solutions
Also available from minimal、developer、monitoring、multi-agent Four sets of presets to start with. For example, preview first and then apply the development preset:
claude-statusline config preset developer --dry-run
claude-statusline config preset developer
Presets can still be edited after they are expanded. Adjust color, number, and model name formatting in Settings; Ctrl+E in Main/Subagents overrides individual formatting.
When satisfied, export to a new file in the current directory:
claude-statusline config export ./statusline.json
On another computer that has the tool installed and connected, place the file in the current directory, check it first, and then import it:
claude-statusline config import ./statusline.json --dry-run
claude-statusline config import ./statusline.json
When the file already exists, please change the file name when exporting. Portable configuration includes options such as display settings and refresh of tool management. Running status and plug-in access preferences need to be managed separately on each machine.
6. Turn on real-time indicators on demand
2026.10.18 Update (npm version): New installations turn off native timing and advanced real-time capture by default, retaining existing explicit preferences. Enable only native timing executables
claude-statusline install --native-timing;Enable complete collection using the followingclaude-statusline install --live-metrics. Both require Claude Code 2.1.289+, run after executiondoctorand restart Claude Code. The following original text is retained, and the description of “Default acquisition of native timing for new installations” applies to historical Python versions.
When you need to check the running status, number of active Agents, structured task progress and recent tools, first confirm that the Claude Code is 2.1.289+ and execute in the system terminal:
claude-statusline install --live-metrics
claude-statusline config enable run-state permission-mode active-agents task-progress last-tool
claude-statusline doctor
After checking, restart Claude Code and load the collector; observe the new fields when running tasks later. This step involves both collector access and display item selection. Simply checking fields in the editor is not enough.
Advanced real-time indicators are turned off by default and managed separately from the native timing metadata collected by default for new installations of compatible hosts. Displayed when there are no valid observations —limited coverage or recent observations may bring *. The task progress comes from structured task records, and how long is left cannot be calculated based on this.
7. Frequently Asked Questions, Upgrade and Uninstall
2026.10.18 Update: npm version troubleshooting, updating, migration and uninstallation
The following new instructions apply to v3.0.0 and later; for Windows claude-statusline.cmd. The original Python/pipx instructions remain in the second half of this section.
1. The command cannot be found after npm installation
After global installation, first check the software package and installation prefix:
npm list --global --depth=0
npm prefix --global
Confirm that npm’s global command directory has been added to PATH, and then reopen the terminal after adjustment. Linux/WSL/macOS available command -v claude-statusline Check entry; Windows PowerShell available Get-Command claude-statusline.cmd. If it still points to the old version of Python/pipx, first follow the migration steps below to process the entry with the same name.
2. Update the globally installed npm version
Exit Claude Code and the configuration editor first, and then execute:
npm install --global --ignore-scripts @fbincon/claude-code-statusline
claude-statusline --version
claude-statusline install
claude-statusline doctor
After passing the check, restart Claude Code. Re-executing the npm installation command will update the software package and still needs to be executed subsequently. install Synchronize command paths, hooks, skills, and plugin resources.pipx upgrade Only historical Python packages are managed and cannot be updated to v3.x.
If you use the independent directory below to install, keep the same one when updating --prefix ./statusline-nodeexecuted through the same Node/JavaScript entry --version、install and doctor;The global npm update command does not update this independent directory.
3. Migrate from Python/pipx to npm
Before switching, exit Claude Code and the configuration editor, and back up the entire Claude configuration directory (default ~/.claude,use CLAUDE_CONFIG_DIR Back up the corresponding directory), record the absolute path and version of the original Python command, and retain the original pipx environment for rollback. Do not write the old and new versions to the same configuration directory at the same time.
To get around a Python command of the same name that is already in your PATH, install it first using a separate directory in a long-term location. Execute the following command from this location to install the new version to ./statusline-nodeand explicitly use the Node entrance to complete the access:
npm install --prefix ./statusline-node --ignore-scripts @fbincon/claude-code-statusline@3.1.0
node ./statusline-node/node_modules/@fbincon/claude-code-statusline/bin/claude-statusline.js --version
node ./statusline-node/node_modules/@fbincon/claude-code-statusline/bin/claude-statusline.js install --dry-run
node ./statusline-node/node_modules/@fbincon/claude-code-statusline/bin/claude-statusline.js install
node ./statusline-node/node_modules/@fbincon/claude-code-statusline/bin/claude-statusline.js doctor
When using a custom configuration directory, the above install and doctor The command is passed in the same --config-dir. Restart Claude Code after passing the check; access will bind the actual Node and JavaScript entries, so the installation directory and Node executable file must be retained during use.
Independent directory installation will not install the claude-statusline Automatically switches to the new version; subsequent configuration, updates and uninstalls should continue through the above node .../claude-statusline.js Entry operations. Existing display configurations, explicit editor and acquisition preferences, and irrelevant Claude settings are retained. Don’t use npm --force Override a command with the same name whose ownership is unknown.
If you need to retain the Python fallback environment, you can continue to use the independent directory; if you need to use the global npm command instead, after the new version is verified, use pipx list Verify the old package name and use it again pipx uninstall fbincon-claude-code-statusline Remove the corresponding old package, and then follow Section 2 to complete the global npm installation and integration. After confirming that the global version is properly connected, delete the independent installation directory. When you need to roll back, follow the new version of the migration and recovery guide to restore the compatible backup and original Python access before the switch.
4. Uninstall npm version
Exit Claude Code and the configuration editor first, remove access while the commands are still available, and then uninstall the package. For global npm installation:
claude-statusline uninstall --dry-run
claude-statusline uninstall
npm uninstall --global @fbincon/claude-code-statusline
Only execute the last item after the access uninstallation is successful. The tool will remove the access resources belonging to this tool, retain third-party settings, and display configuration, preferences, cache, task status and backup to facilitate reinstallation and reuse.
If using a separate directory installation, through the same node .../claude-statusline.js Entries are executed sequentially uninstall --dry-run and uninstallconfirm success and then delete the specially created statusline-node Installation directory.npm uninstall --global is not responsible for removing such stand-alone directory installations.
The following content retains the original FAQ, Python/pipx upgrade and uninstallation. involving pipx or .exe The steps are applicable to v2.0.0 and before; please use the above update instructions for the npm version.
Command not found: Run first pipx list Confirm that the package has been installed before executing pipx ensurepath and reopen the terminal. Windows use claude-statusline.exe。
The status bar does not appear: run claude-statusline doctorcheck PATH, whether the access is completed, whether the displayed items are empty, and whether the host has disabled hooks/statusline; restart Claude Code after the access is repaired. If the prompt is skipped due to trust, follow the host prompts to complete the corresponding trust operation.
Configuration entry is unavailable: examine claude --versioninstallation preferences and plug-in status. Incompatible entries will be suspended; re-execute after host upgrade install and doctor. In-session Clients on macOS still have documented interaction restrictions and can use a standalone TUI or CLI.
Some data are temporarily missing: Before the first real model response, the transcript or usage information may not be generated; fields such as limit and effort also depend on whether the host provides it.doctor of [WARN] It indicates that there is a downgrade situation and needs to be judged based on specific prompts.
When upgrading, exit Claude Code first and execute in the terminal:
pipx upgrade fbincon-claude-code-statusline
claude-statusline install
claude-statusline doctor
Then restart Claude Code. After the software package is upgraded, it must be accessed simultaneously. If you have used the old distribution name of this warehouse, first verify the installation source, and then follow the package name migration instructions.
When uninstalling, first exit Claude Code, then remove the access, and finally uninstall the software package:
claude-statusline uninstall --dry-run
claude-statusline uninstall
pipx uninstall fbincon-claude-code-statusline
The displayed configuration, running status and backup will be retained for easy reinstallation and reuse. See the complete user guide for more troubleshooting steps.
8. Project and document entrance
Project uses MIT license. Source code, distribution packages and detailed documentation can be obtained from the following entrance:
Keep the Python version for reference:
You are welcome to adjust the display content based on your own development habits.